Google Pay
This guide provides an overview of using Google Pay with Netaxept and offers step-by-step instructions for a successful implementation.
Overview
Google Pay is a digital wallet developed by Google that allows users to store payment cards and make fast, secure transactions. It provides a seamless checkout experience, whether on Android devices or in supported browsers. With millions of users worldwide, Google Pay works with a wide range of banks and payment card providers across the globe.
Functionalities
| Functionality | API Parameters | Supported |
|---|---|---|
Currencies | - | All |
| Countries | - | All |
| Account verification | Process (VERIFY) | ✅ |
Refund | Process (CREDIT) | ✅ |
Partial refund | Process (CREDIT) transactionAmount = [partial amount] | ✅ |
| Partial capture | Process (CAPTURE) transactionAmount = [partial amount]
| ✅ |
Full reversal | Process (ANNUL) | ✅ |
| Partial reversal (only for PreAuth) | Process (AUTH) authType = reversalAuth transactionAmount = [reversed amount]
| ✅ |
| Partial capture with automated reversal of uncaptured amount (only for PreAuth) | Process (CAPTURE) isFinalCapture = true | ✅ |
Incremental authorization (only for PreAuth) | Process (AUTH) authType = incrementalAuth transactionAmount = [additional amount] | ✅ |
| Recurring payments | recurringType = R | ✅ |
| UCOF payments | recurringType = S | ✅ |
Google Pay is supported by Nets acquiring.
Supported card schemes
The supported card schemes may vary depending on both the issuing bank and the acquirer.
- Visa
- Mastercard
- American Express
- Discover
- Diners Club International
- JCB
Liability Shift
If you want to learn all about liability shift with Google Pay, please review this guide - Shift liability to issuer.
Integration options
- Merchant hosted
- Netaxept hosted
Merchant Hosted Integration
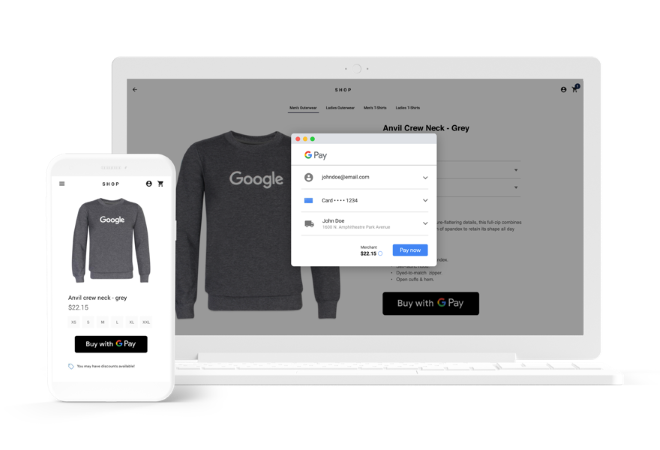
As the name suggests, this method expects you to handle the direct integration of Google Pay into your checkout. Before proceeding, we strongly recommend familiarizing yourself with how Google Pay works. For more details, visit the official page: Google Pay official documentation
Activation in Netaxept
The activation can be achieved following the steps below:
- Log in to the Admin portal.
- Go to Options.
- Select the Agreement tab.
- In the Agreements dropdown search and select Google Pay.
- Click on the Add button.
- Select Currency*.
- Click on the Add button.
*Note that if you have a multicurrency account, the activation process above must be repeated for each desired currency.
Google Pay API Integration Guidelines
When building the PaymentDataRequest that you'll be sending to Google make sure that:
allowedPaymentMethods.parameters.allowedAuthMethodsis set to bothPAN_ONLYandCRYPTOGRAM_3DS. This ensures that all of the customer’s available cards appear as payment options, whether they are stored in the user's Google Account or as Android device tokens.allowedPaymentMethods.parameters.allowedCardNetworksis populated according to the card schemes supported for your account.allowedPaymentMethods.tokenizationSpecification.typeis set toPAYMENT_GATEWAY.allowedPaymentMethods.tokenizationSpecification.parameters.gatewayis set toepaymentnets. This tells Google that your integration will be processed via Netaxept.allowedPaymentMethods.tokenizationSpecification.parameters.gatewayMerchantIdis filled with your Netaxept merchand Id.
Netaxept API Integration Guidelines
The following Google Pay-specific parameters must be included in the Netaxept's Register request:
paymentDatamust be filled with the PaymentData response payload received from Google.paymentMethodActionListmust be set to[{"PaymentMethod":"GooglePay"}].serviceTypemust be set toM.redirectUrlis mandatory only for the Web interface.
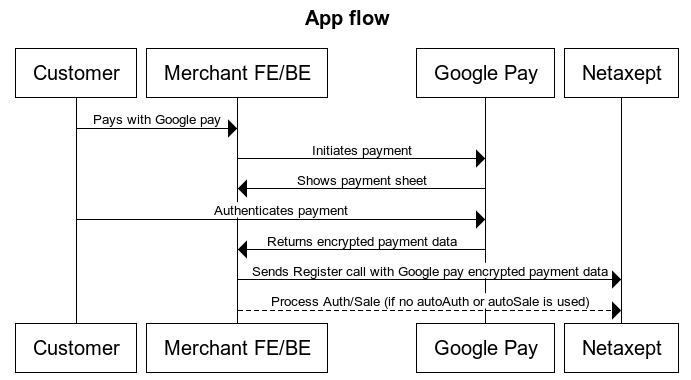
If possible, it is recommended to use the auto-sale or auto-auth option to skip the Process request and complete the authorization immediately after the Register step is finalized.
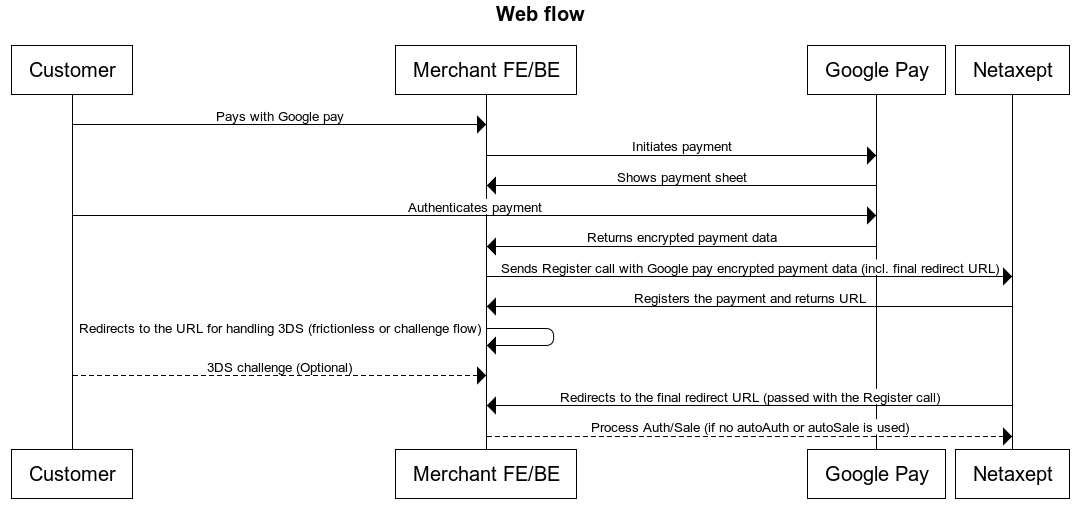
If the payment data provided by Google is plain (not tokenized), the payment flow must go through a mandatory 3DS authentication step. To achieve this, you will need to redirect the user to the URL returned in the <URL> element of the Register response. In the case of tokenized card data, you will still follow the same process, but instead of 3DS authentication, the user will land directly to the redirectUrl you provided with the Register request.
The snippets below show examples of Register request and response payloads.
Google Pay Register Request
https://test.epayment.nets.eu/Netaxept/Register.aspx?
merchantId=xxxxxx
&token=xxxxxxxxxx
&orderNumber=123456
Google Pay Register Response
<?xml version="1.0" encoding="utf-8"?> <RegisterResponse xmlns:xsd="http://www.w3.org/2001/XMLSchema" xmlns:xsi="http://www.w3.org/2001/XMLSchema-instance"> <TransactionId>1234567890</TransactionId> <URL>https://test.epayment.nets.eu/epay/default.aspx?merchantId=xxxxxx&transactionId=1234567890</URL>
Please note that the URL value inside the Register response is XML encoded. If you're performing manual testing, you will need to decode the URL before opening it in a browser.
Netaxept Hosted Integration
This integration option works exclusively with the Netaxept two-page payment window.
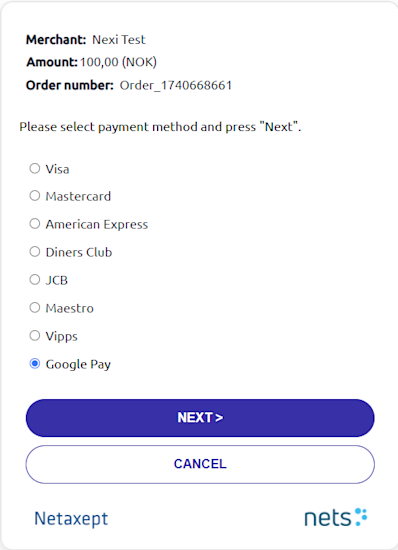
For this type of integration, a dedicated Google Pay merchant account is not required.
Activation in Netaxept
The activation can be achieved following the steps below:
- Log in to the Admin portal.
- Go to Options.
- Select the Agreement tab.
- In the Agreements dropdown search and select Google Pay.
- Click on the Add button.
- Select Currency*.
- Enter your Webshop hostname. That must be the hostname of the website where the checkout initiation occurs. Expected format 'www.webshop.com'.
- Click on the Add button.
*Note that if you have a multicurrency account, the activation process above must be repeated for each desired currency.
Subscription-based payments
Netaxept supports Recurring and Unscheduled Credential-on-File (UCOF) payments for Google Pay. You can process subscriptions, memberships, and other recurring transactions seamlessly following the same flow as you do for standard card payments.
Recurring payments
Initial payment
You need to add the following parameters in the Register request for the first transaction:
recurringTypemust be set toR.recurringFrequencyspecifies the desired frequency at which the customer will be charged.recurringExpiryDateis the date when the agreement for the payment expires.
After successful authorization, you must use the Query request on the specific transaction to retrieve the token from the panHash parameter, which will be returned in the response. You must store and use this payment token reference for all subsequent transactions in this payment flow.
Subsequent payments
Please make sure that all subsequent Register requests include the following data:
panHashmust be filled with the payment token generated in the initial transaction.serviceTypemust be set toA.recurringTypemust be set toR.
Please note that all subsequent transactions will be processed as standard card merchant-initiated payments.
For more details on how to use the API parameters above, refer to the API reference.
Unscheduled Credential-on-File (UCOF) payments
Initial payment
You need to add the following parameters in the Register request for the first transaction:
recurringTypemust be set toS.
After successful authorization, you must use the Query request on the specific transaction to retrieve the token from the panHash parameter, which will be returned in the response. You must store and use this payment token reference for all subsequent transactions in this payment flow.
Subsequent payments
Please make sure that all subsequent Register requests include the following data:
panHashmust be filled with the payment token generated in the initial transaction.serviceTypemust be set toA.recurringTypemust be set toM.recurringTransactionTypemust be set to1.
Please note that all subsequent transactions will be processed as standard card merchant-initiated payments.
For more details on how to use the API parameters above, refer to the API reference.
Testing
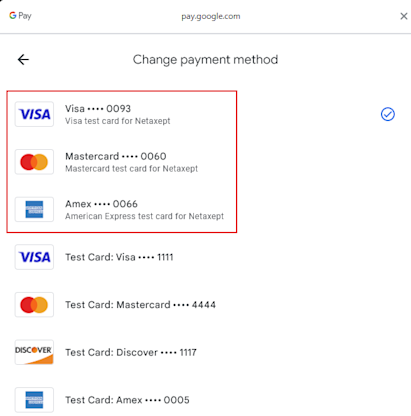
To properly test your Google Pay integration with Netaxept, you'll need to join the Google Pay test card suite group.
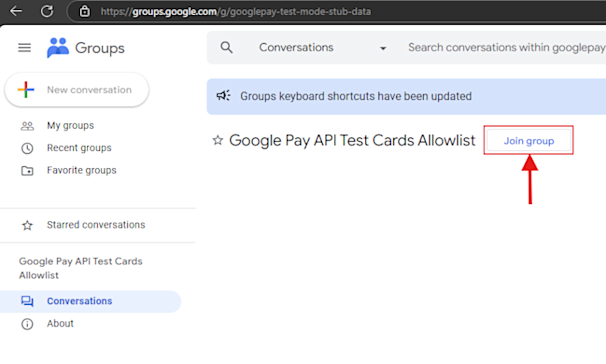
This action configures your Google Pay account to display a set of test cards in the Sandbox environment instead of real production-linked cards on the payment method selection screen. Please use the Netaxept test cards from that list.
