Payment Window modes
There are three different Payment Window modes to choose from: two-page mode, single page mode and the mini page layout mode.
Overview
Even though the Payment Window is going to be hosted by Nets (the Register' calls type parameter is set to NetsHostedEcom there are ways to individually customize the Payment Window.
Two-page mode
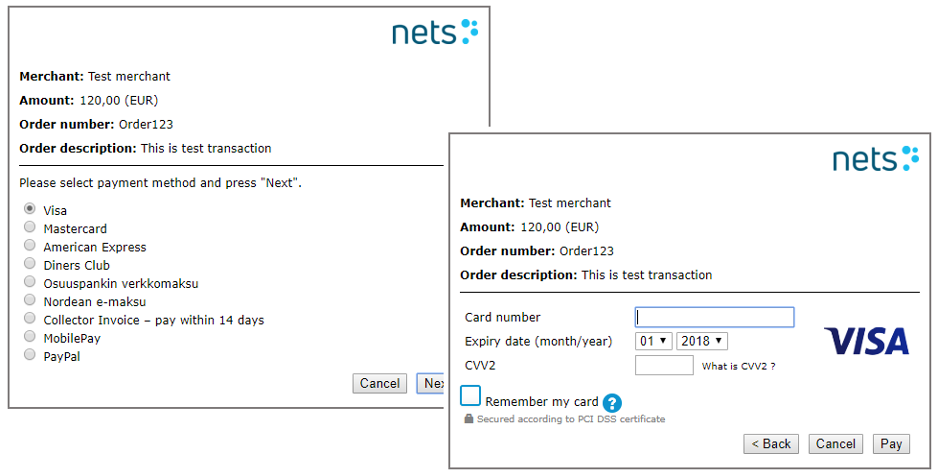
The two-page payment window is the default terminal option and can be used for all payment methods. It is optimised for both, web and mobile.
The first page presents the customers with the payment methods to choose from. In a second step, they are either directed to the actual payment window or directly to the site of the selected payment method provider for entering their payment details.

Single page mode
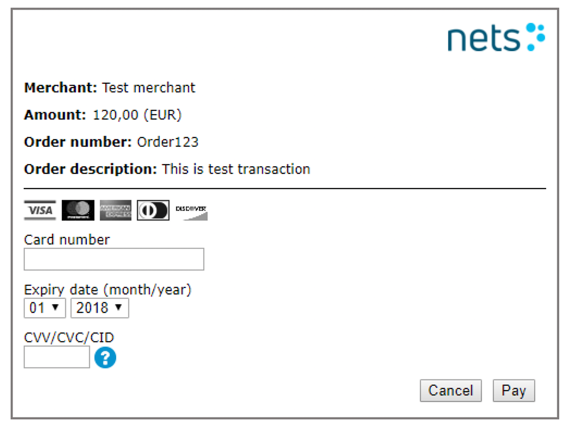
For card payments, you can choose the single-page mode. Here the payment method menu is omitted, and the customers are directed to the payment window where they can enter their payment details.
The card type will be identified according to the submitted card number.
To activate the single page mode, the Register call’s terminalSinglePage parameter must be set to true.

Single page mode and non-card payments
Since Single page mode only allows card payments, customers with non-card payments must be directed to the site of the selected payment provider instead.
For that to work, you must implement an additional step for your customers to choose their payment method. You then sent the selected payment method in the Register call’s paymentMethodActionList parameter.
The paymentMethodActionList is an array of available payment methods, specific fees and certain actions that you can define for each available payment method individually. Learn more about the paymentMethodActionList parameter.
paymentMethodActionList - array - example
[
  {
    "PaymentMethod":"Visa",
    "Fee":"100"
Your customers are then directed to either the single page mode payment window, or directly to the site of the selected payment provider.
Mini layout mode
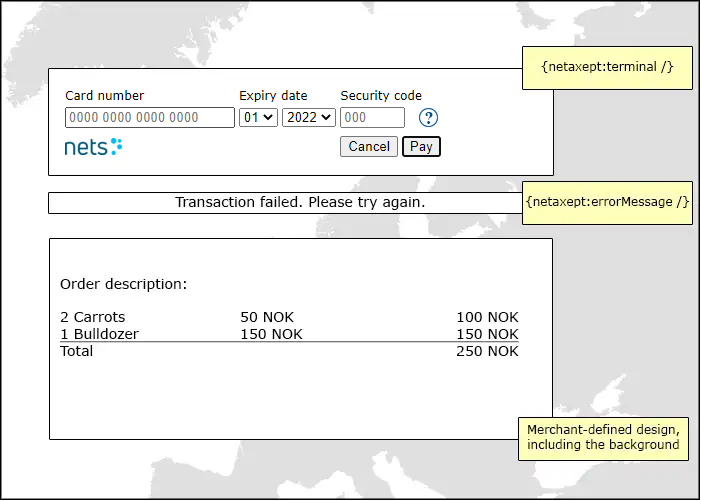
For maximum control of the design of your checkout page, you can choose the mini payment window. This window is optimized to be as small as possible covering only input fields for a payment card.

The mini payment window is supported by both, web and mobile terminals, but only for cards. If you are looking to implement other payment methods as well, we suggest that you implement a separate step for your customers to select a payment method. This way you can implement a path using single page for cards and a separate path for other payment methods. In that case, you need to send the name(s) of the payment method(s) in the Register call’s paymentMethodActionList.
To activate mini layout mode, the Register call’s terminalLayout parameter must be set to mini: terminalLayout=mini. You also must design a template that you want to use in mini layout mode and activate it either in Netaxept Admin or by specifying the template name in the terminalDesign parameter of the Register call.
In mini payment window, no information about the order or merchant is displayed by default. Therefore, we recommend to use the Register call's templateData parameter, to pass on for example the transaction amount and description of the order, if applicable.
Since the mini payment window is optimized for staying as small as possible, error messages are not displayed inside the payment window. Instead, you can place the error message anywhere else on your webpage by using the specific error tag {netaxept:errorMessage /}.
When using mini payment window, both the two special tags {netaxept:terminal /} and {netaxept:errorMessage /} need to be present in Netaxept Admin's Template design section for the mini payment window.
Custom mode
The Custom template functionality is an additional service and allows even more flexibility when designing the payment window templates.
To be able to use Custom templates functionality, you need to have the correct additional service chosen in your Netaxept agreement. Otherwise the functionality will not be enabled in your account.
In order to use Custom templates, the Register call's terminalLayout parameter must be set to custom.
The main difference between regular templates and custom templates is that the tag netaxept:terminal is replaced with a set of individual tags as described under Customization.