Manage payments
This guide describes how to manage your payments in Checkout Portal.
Before you start
Important
Before you start, you need an Checkout Portal account. Please refer to the guide:
- How to create a test account for Checkout..
Overview
The Nexi Checkout Portal lets you manage the full lifecycle of a payment after a customer places an order — from charging the authorised funds to issuing refunds. This guide walks through the three most common actions you will perform from the Payments screen.
What this guide covers
- Full refund — returning the entire order amount to the customer.
- Partial refund — returning only selected items from an order.
- Charging an order — capturing funds for a reserved payment, including how to add a custom order line before charging.
Understanding payment statuses
Every payment in the portal carries a status that tells you which actions are available. The table below explains the statuses you will encounter in this guide.
| Status | What it means |
|---|---|
| Reserved | Funds are authorised on the customer’s card but not yet charged. The payment must be charged before the money reaches your account. |
| Charged | Funds have been charged. The payment can now be refunded in full or in part. |
| Refunded | All or part of the order amount has been returned to the customer. |
TIP Finding a payment quickly Use the search bar at the top of the Payments screen and switch the lookup field to Payment ID or an Order ID for an exact match. You can also search by other identifiers. The status filter tabs — All, Reserved, Charged, Refunded, Cancelled, Failed — let you narrow the list before searching.
Issuing a Full Refund
A full refund returns the entire amount of a charged payment to the customer. Use this when an order is cancelled in its entirety or the customer returns all items.
NOTE Before you start The payment must be in the Charged status. If it is still Reserved, charge it first (see Section 4). The guide uses Payment ID as the lookup field, however you may use Order ID or any other available identifier like last 4 digit card number etc based on your need.
Step-by-step
-
Log in to the Nexi Checkout Portal Sign in with your portal credentials. You will land on the Dashboard.
 The Dashboard — your starting point after logging in.
 -
Open the Payments screen Select Payments from the left-hand navigation menu to see your list of transactions.
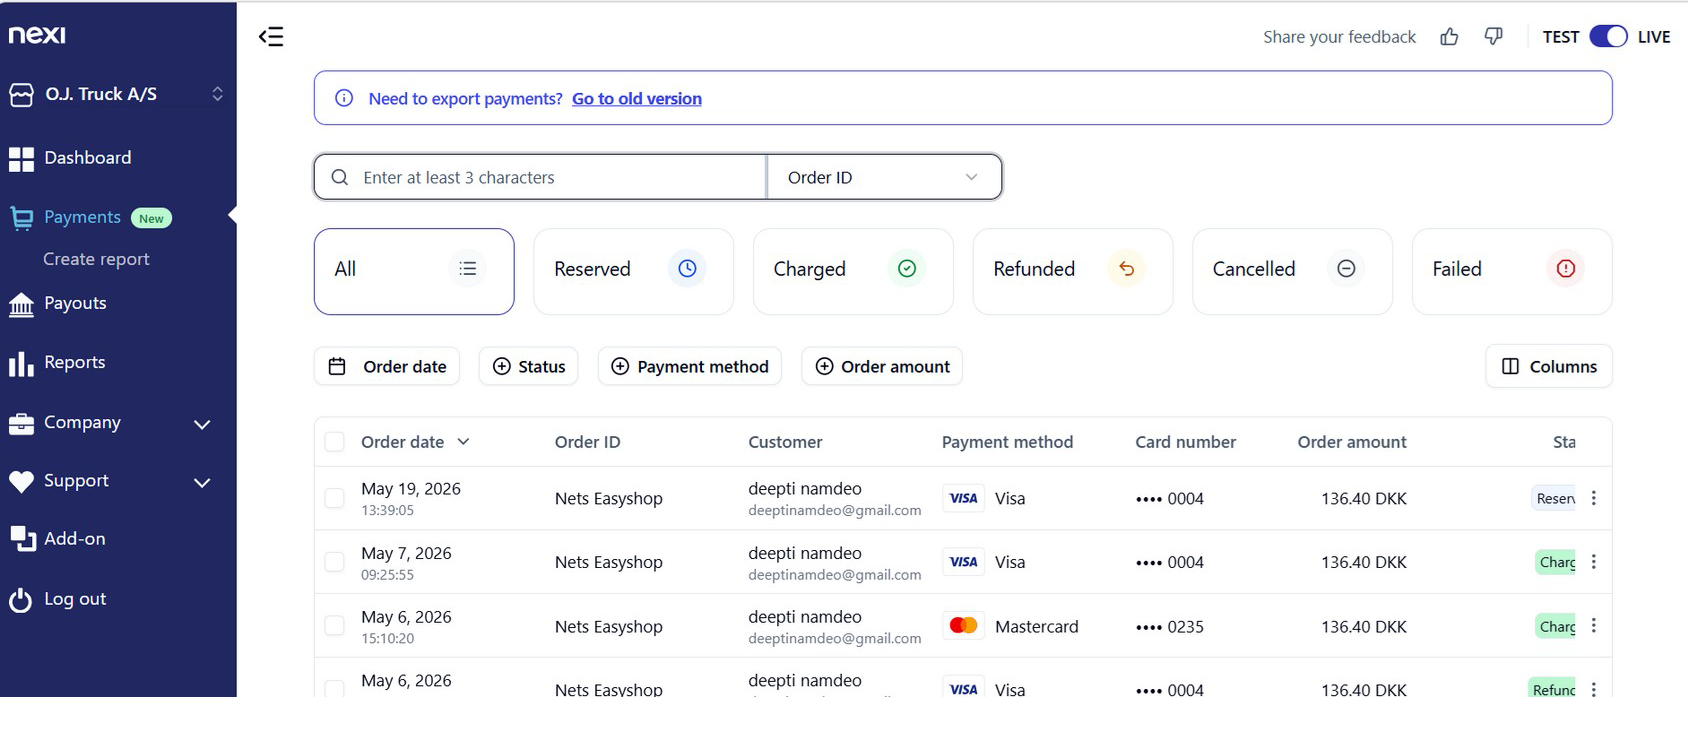 The Payments screen lists all transactions with their current status.
 -
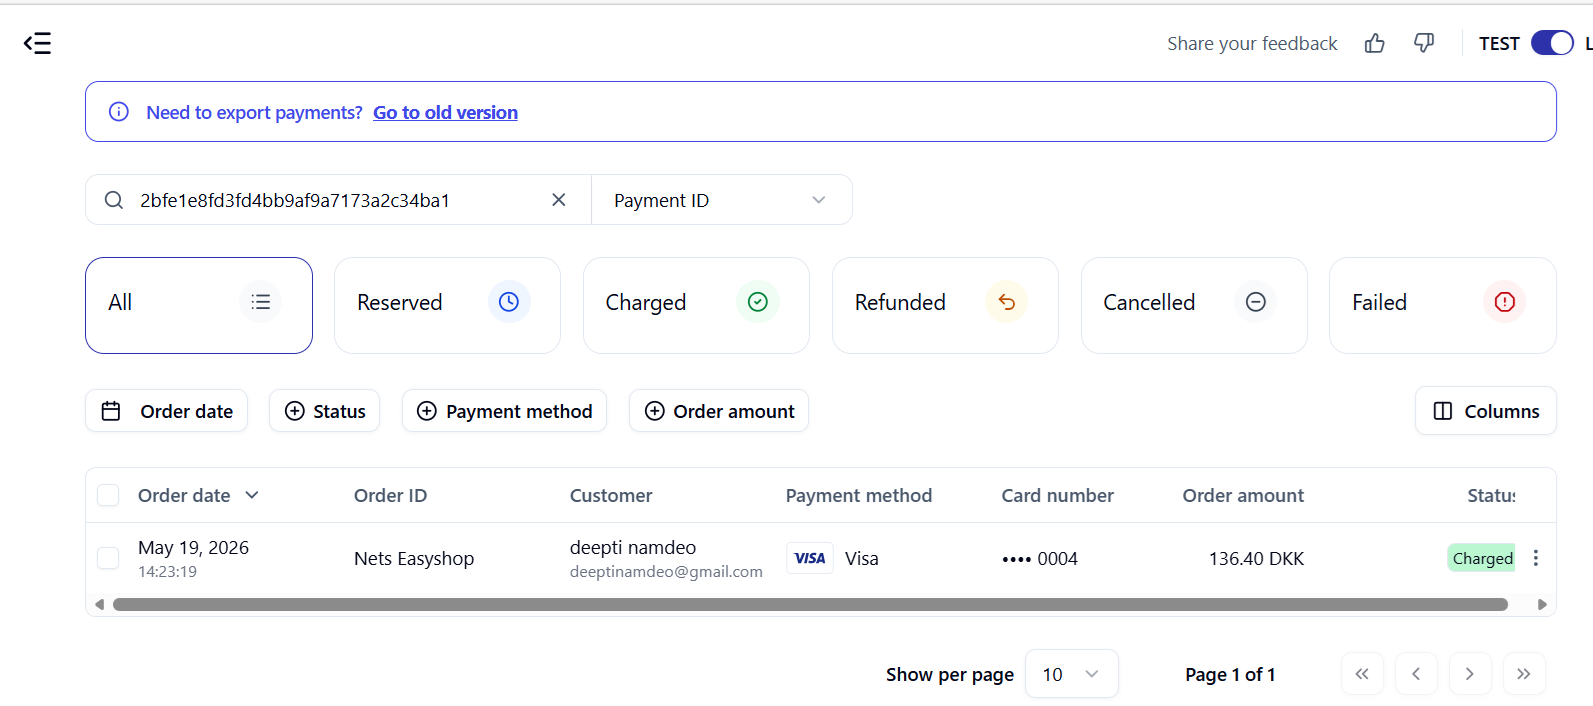
Search for the payment Enter the Payment ID in the search bar and confirm the lookup field is set to Payment ID. The matching payment appears in the list.
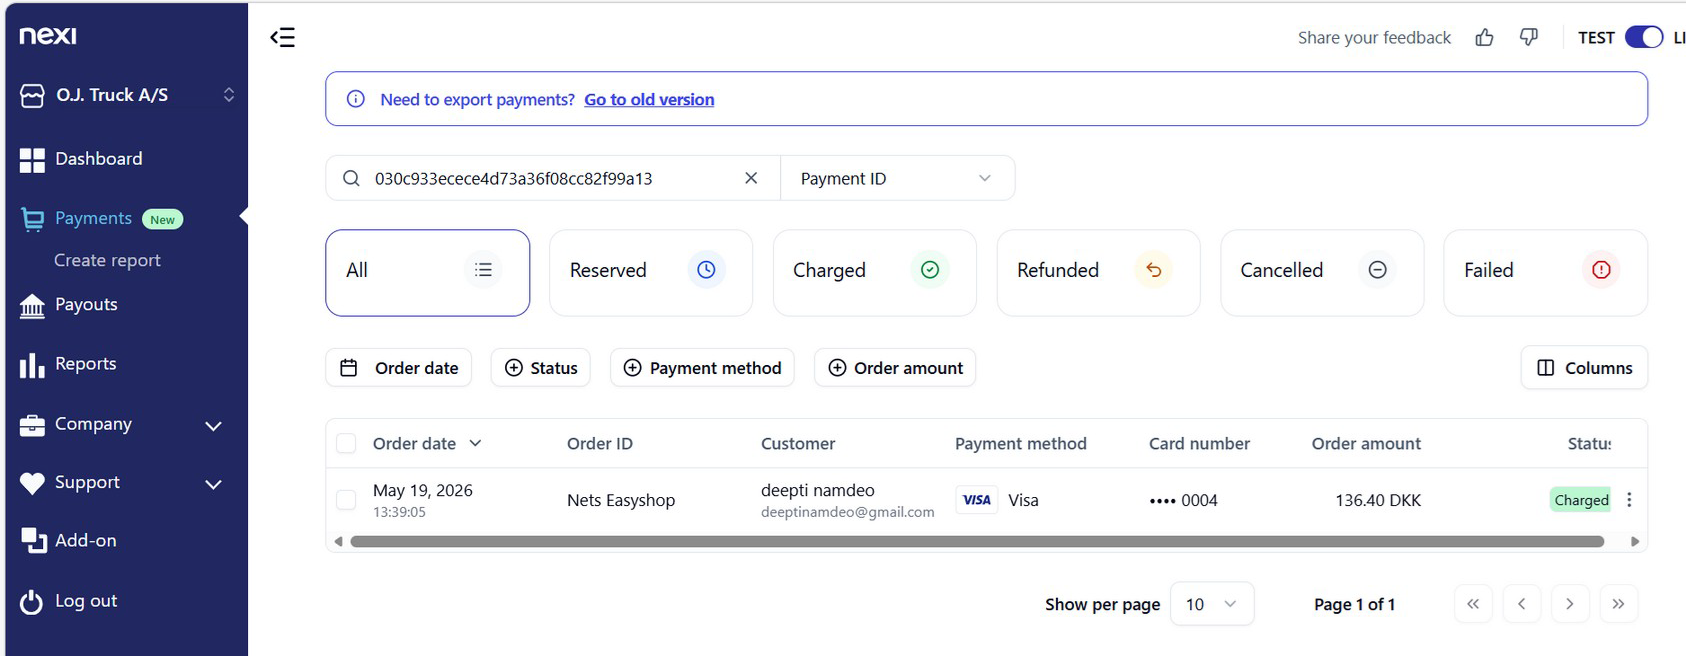 A single Charged payment located by its Payment ID.
 -
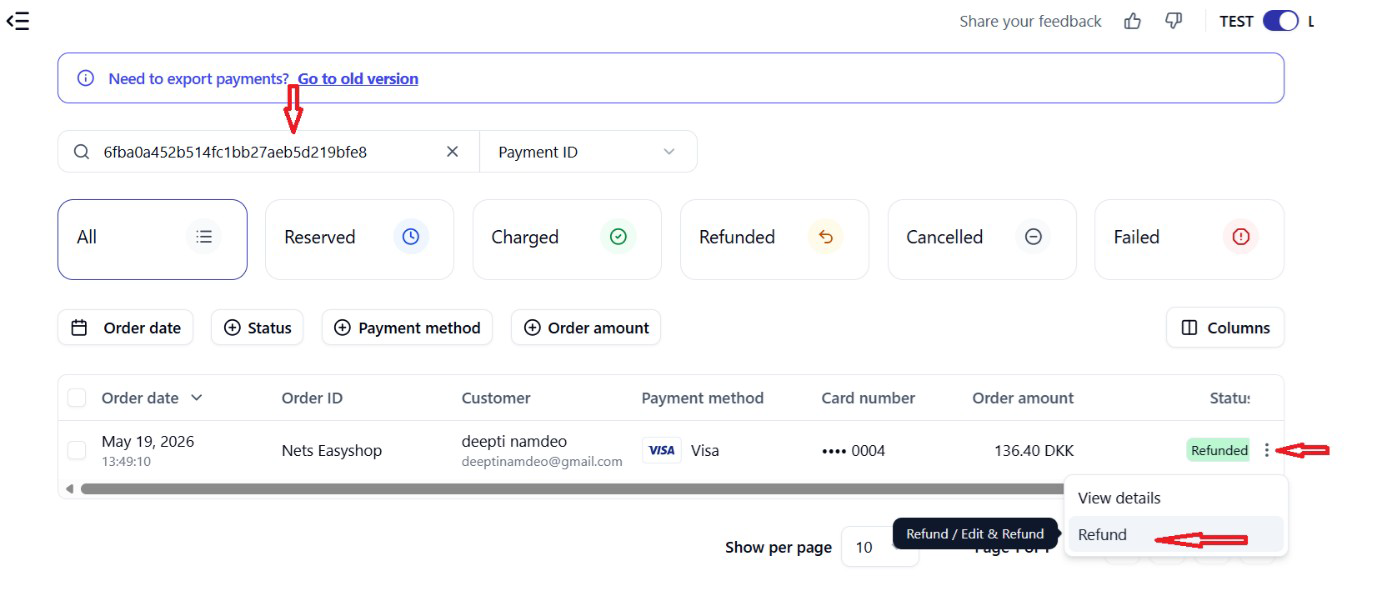
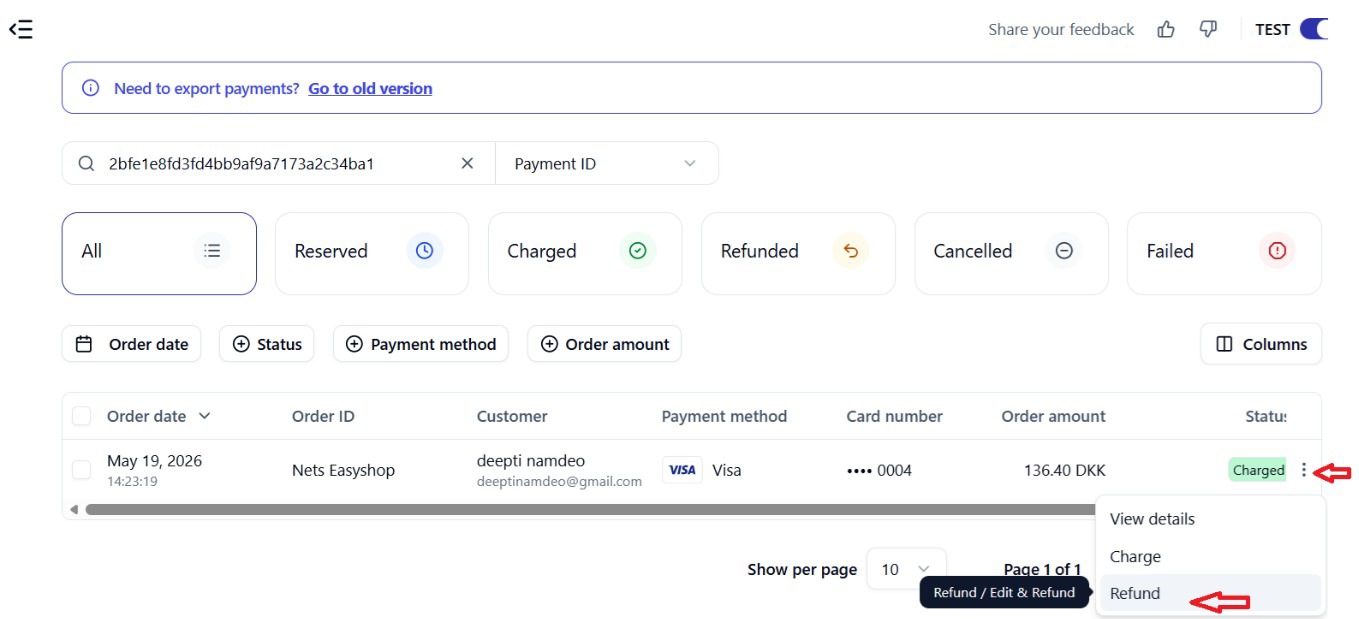
Open the Quick Action menu and select Refund Click the three-dot ( ⋮ ) icon at the end of the payment row to open the Quick Action menu, then choose Refund.
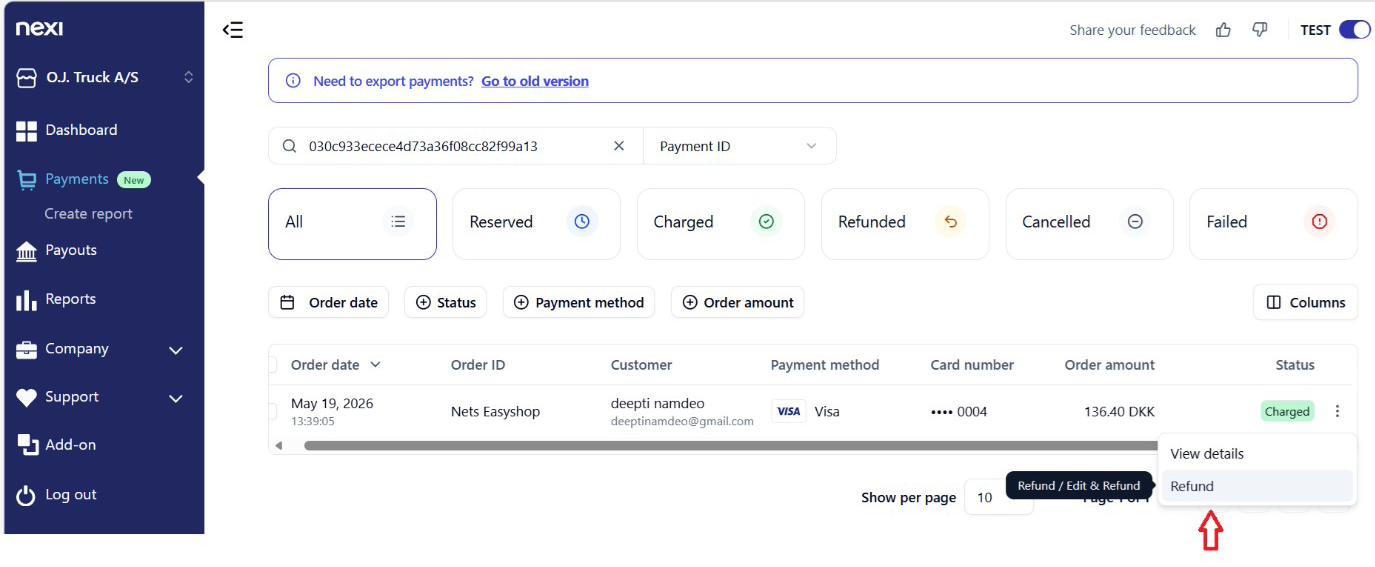 The Quick Action menu — select Refund to open the refund dialog.
 -
Confirm the full refund The Refund dialog opens on the Refund all tab and displays the full order total. Click the Refund button to return the entire amount to the customer.
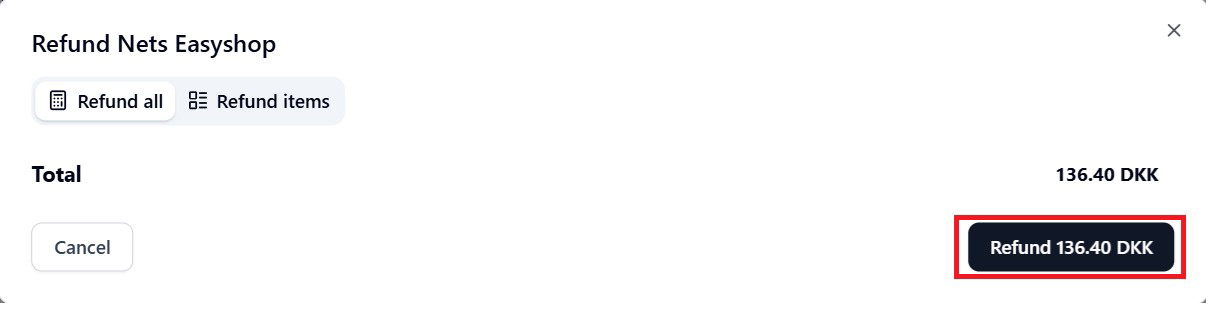 The Refund all tab — click Refund to return the full amount.
 -
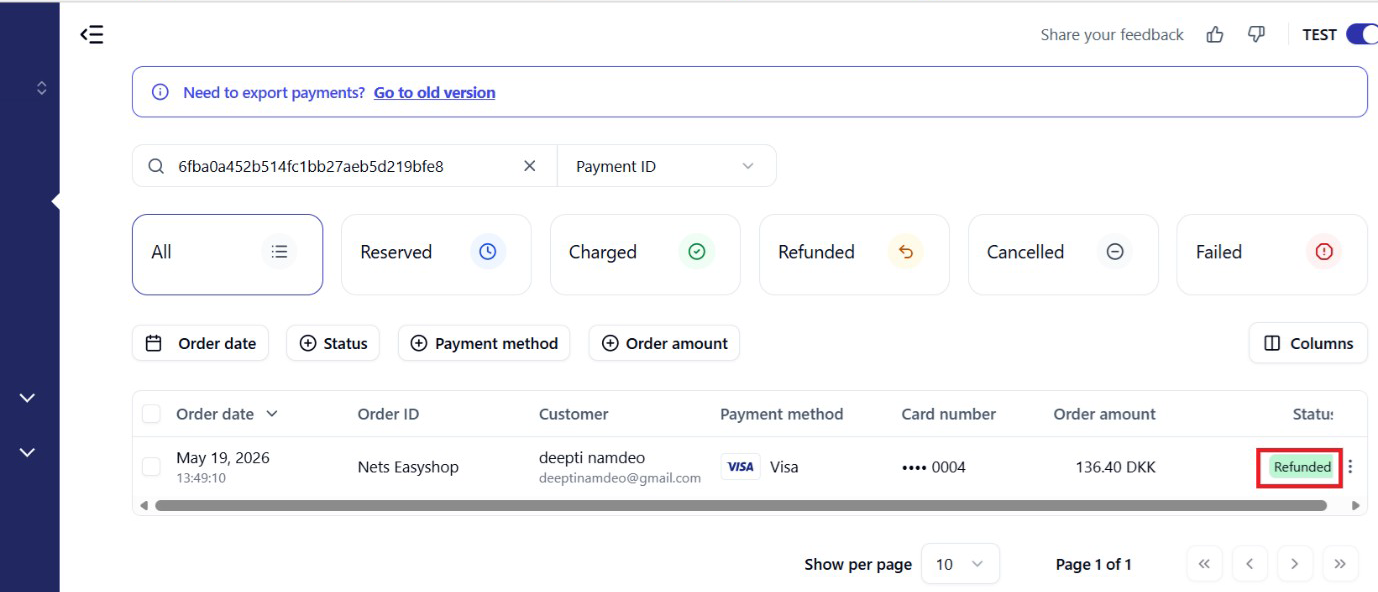
Confirm the refund is complete The payment status updates to Refunded in the Payments list, confirming the money has been returned.
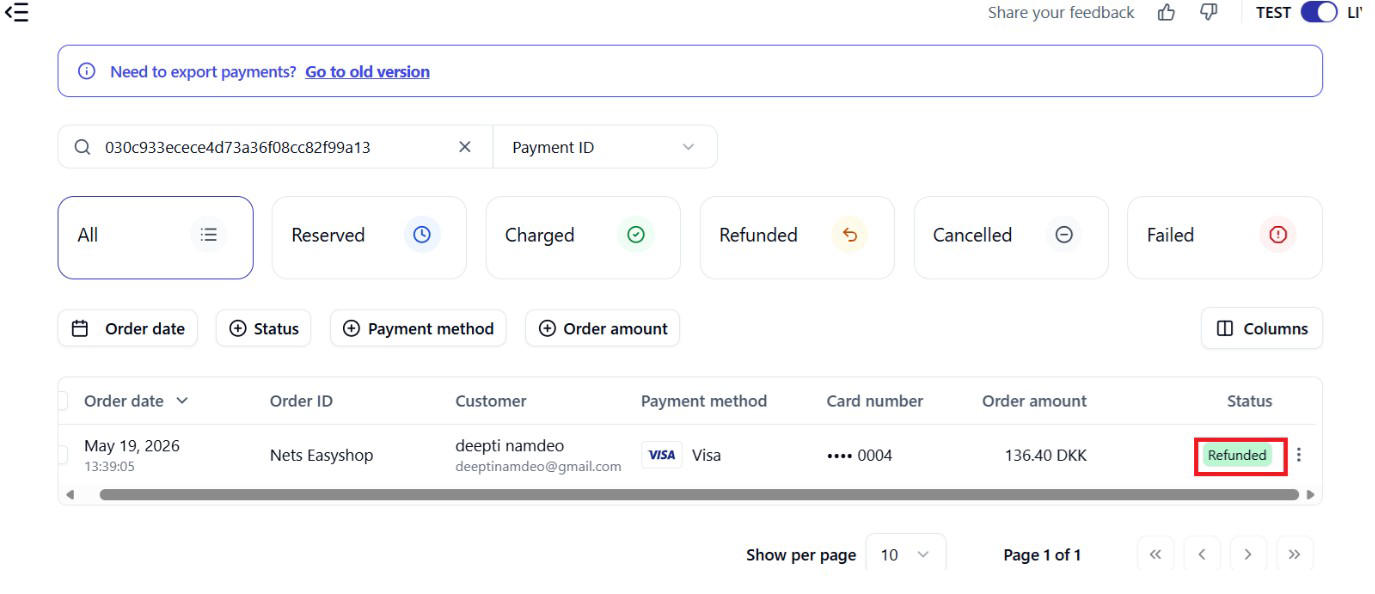 The payment now shows the Refunded status.
 The Dashboard — your starting point after logging in.
 The Payments screen lists all transactions with their current status.
 A single Charged payment located by its Payment ID.
 The Quick Action menu — select Refund to open the refund dialog.
 The Refund all tab — click Refund to return the full amount.
 The payment now shows the Refunded status.
TIP A full refund always returns the complete order amount. To return only some items, use a partial refund instead — see Section 3.
Issuing a Partial Refund
A partial refund returns only selected items from an order while leaving the rest of the payment intact. Use this when a customer returns some — but not all — of what they purchased.
Step-by-step
-
Search for the payment and open the Refund dialog On the Payments screen, search for the payment by its Payment ID. Open the Quick Action menu (⋮) on the payment row and select Refund.
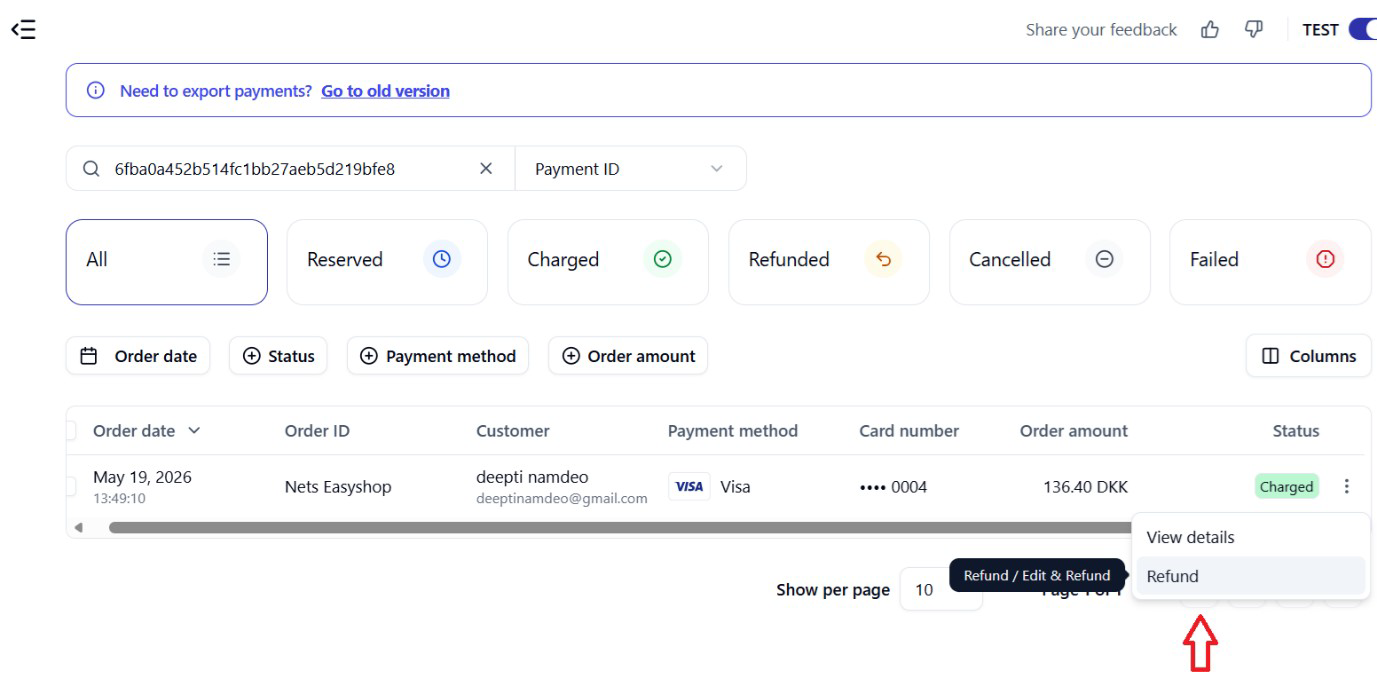 Select Refund from the Quick Action menu of the charged payment.
 -
Switch to the Refund items tab When the Refund dialog opens, click Refund items. This shows every line item in the order, each with its own checkbox.
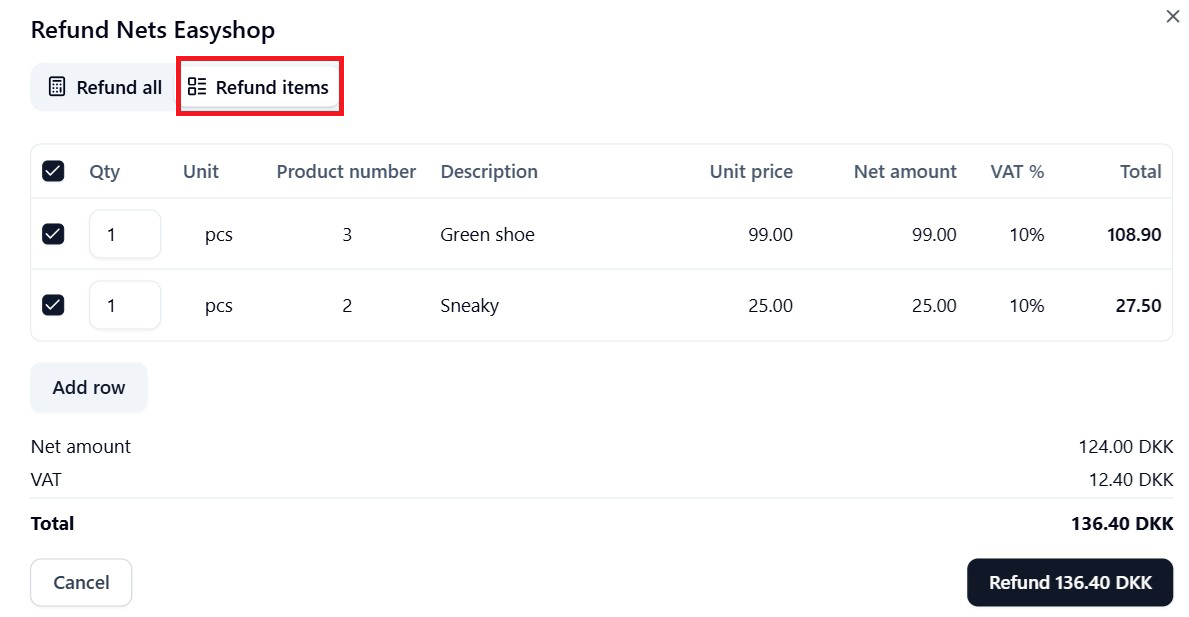 The Refund items tab lists each order line individually.
 -
Select the items to refund Tick the checkbox for each item you want to return. Here, only one item is selected, and the dialog total updates to reflect just that item.
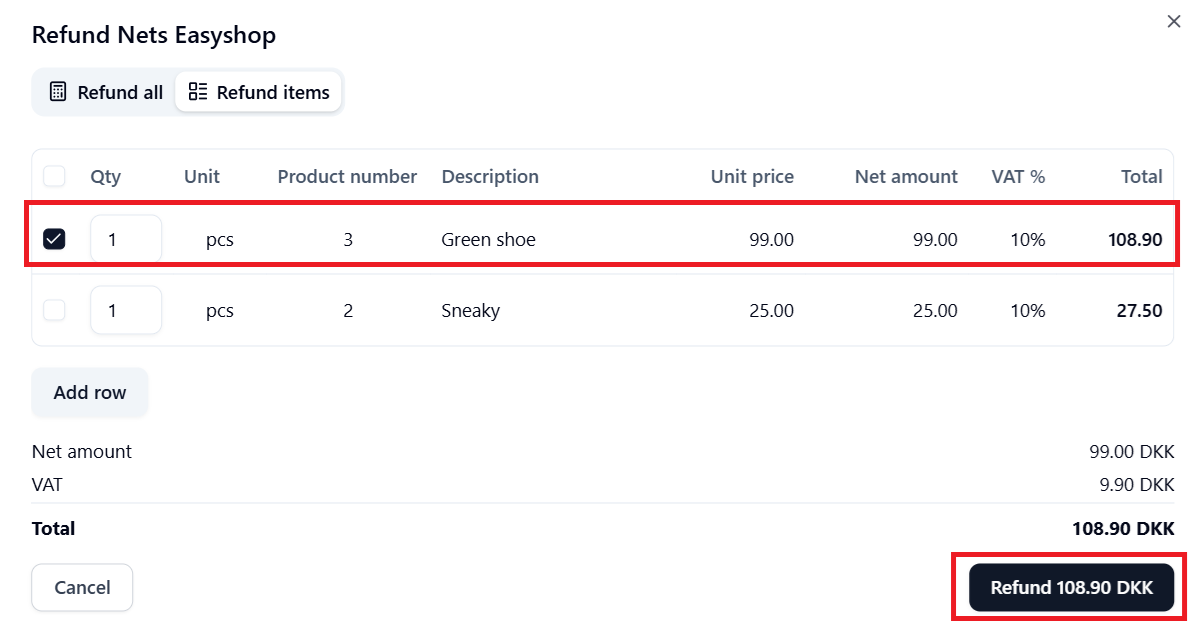 Only one item is selected — the refund total recalculates automatically.
 -
Confirm the partial refund Click the Refund button. The amount shown on the button reflects only the selected items.
-
Confirm the refund is complete The payment status updates to Refunded in the Payments list.
 The payment shows Refunded after the partial refund is processed.
 Select Refund from the Quick Action menu of the charged payment.
 The Refund items tab lists each order line individually.
 Only one item is selected — the refund total recalculates automatically.
 The payment shows Refunded after the partial refund is processed.
IMPORTANT Remaining items can still be refunded Because only some items were refunded, the rest of the order remains available to refund later. If you open the Refund dialog again, the items that were not yet returned are still listed and selectable.
- Refunding the remaining items later
To return the rest of the order, repeat the process. Open the Quick Action menu on the same payment and select Refund again.
 Re-opening the Quick Action menu to refund the remaining items.
 Re-opening the Quick Action menu to refund the remaining items.
On the Refund all tab, the dialog now shows only the value of the items still outstanding.
 The Refund all tab shows the remaining outstanding amount.
On the Refund items tab, only the items not yet refunded are listed. Select them and click Refund to complete the return.
 The remaining item is still available to refund.
Charging an Order
Charging captures the funds that were authorized when the customer placed their order. A payment in the Reserved status must be charged before the money is settled to your account. This section also shows how to add a custom order line before charging — and how that charged amount then becomes available to refund.
NOTE Before you start The payment must be in the Reserved status. A payment that is already Fully Charged cannot be charged again.
Step-by-step
-
Open the Quick Action menu and select Charge On the Payments screen, locate the reserved payment. Open the Quick Action menu (⋮) on the payment row and select Charge.
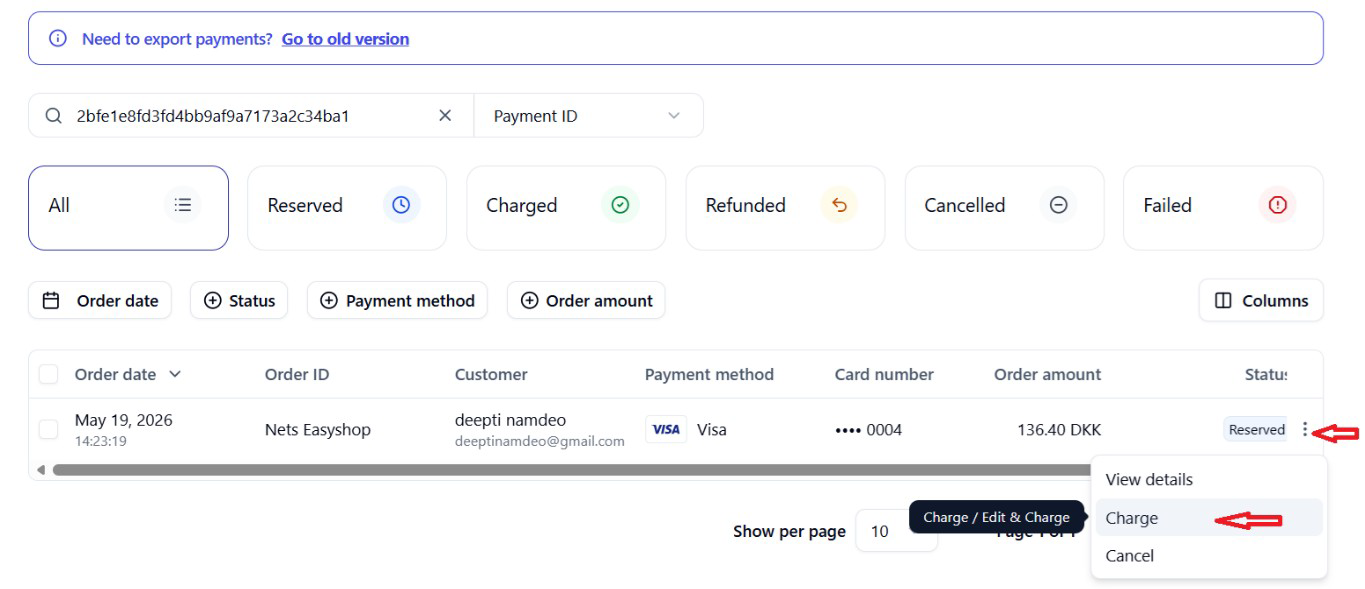 Select Charge from the Quick Action menu of a Reserved payment.
 -
Switch to the Charge items tab When the Charge dialog opens, click Charge items to see the individual order lines.
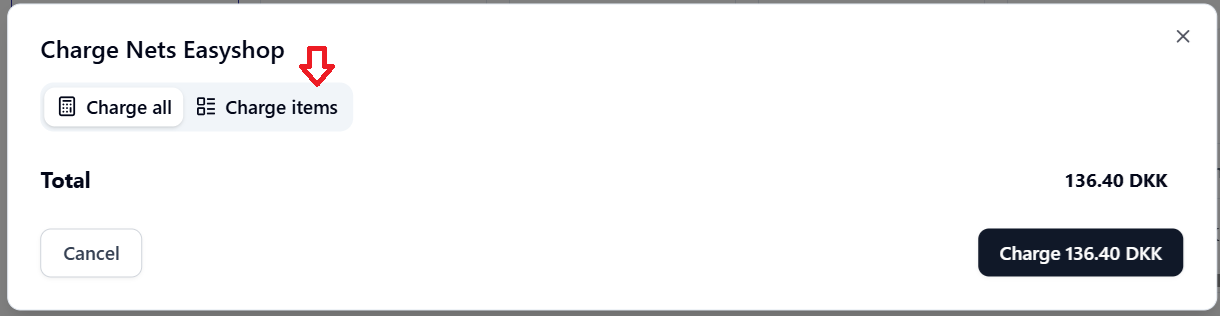 Open the Charge items tab to work with individual lines.
 -
Add a custom order line Deselect any existing item you do not want to charge, then click Add row to insert a new, custom order line.
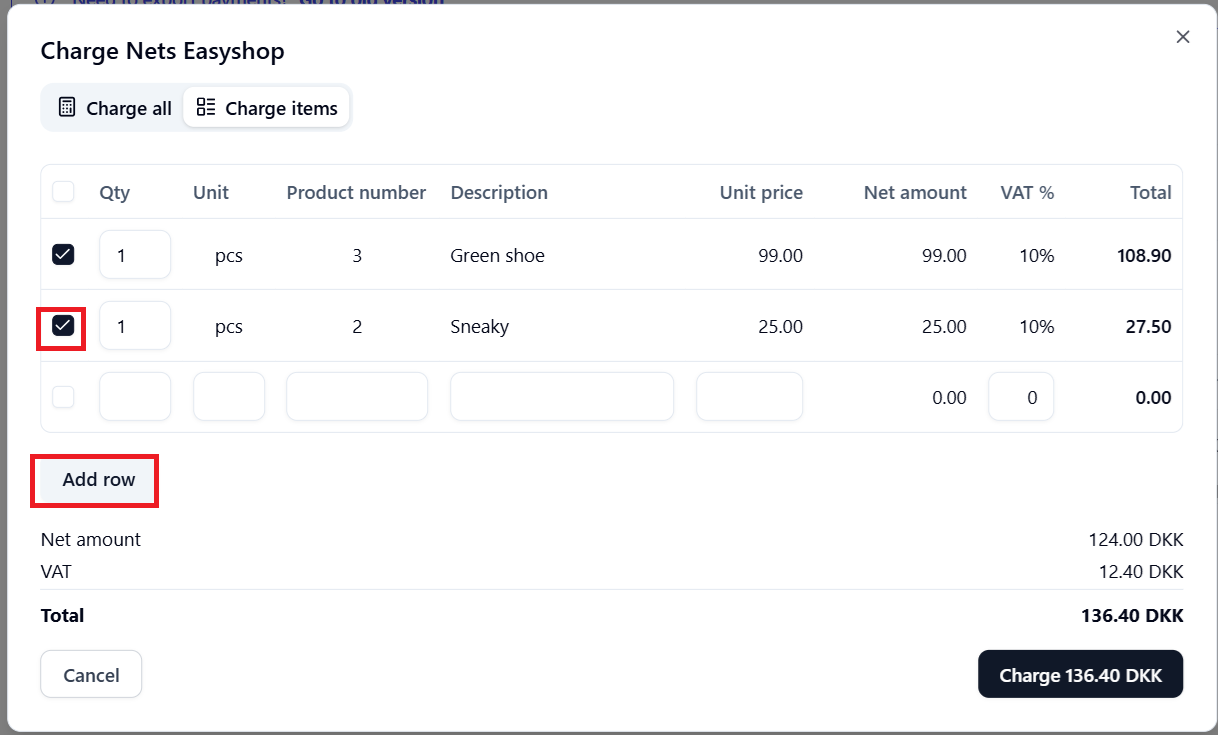 Use Add row to insert a custom order line.
 -
Enter the custom line details and charge Fill in the details for the custom line — quantity, product number, description, and unit price. The dialog total updates to match. Click the Charge button to capture the funds.
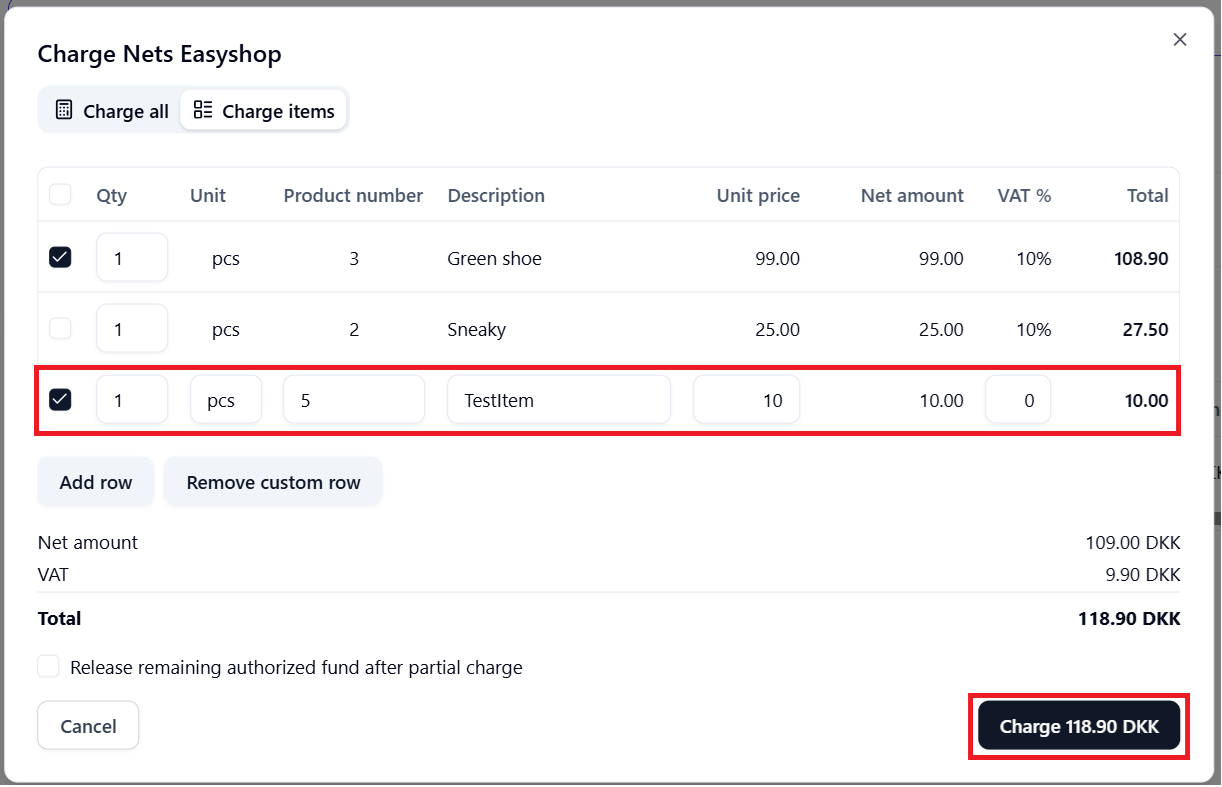 A custom line is added; the Charge button reflects the new total.
 -
Confirm the payment is charged The payment status updates to Charged in the Payments list. The charged amount is now ready to be settled — and is available to refund if needed.
 The payment now shows the Charged status.
 Select Charge from the Quick Action menu of a Reserved payment.
 Open the Charge items tab to work with individual lines.
 Use Add row to insert a custom order line.
 A custom line is added; the Charge button reflects the new total.
 The payment now shows the Charged status.
Refunding a charged amount with updated Order Items
Once a payment has been charged, the charged amount becomes available to refund. In this example, the charged amount of 118.90 DKK can now be returned to the customer.
-
Open the Quick Action menu and select Refund On the charged payment row, open the Quick Action menu (⋮) and choose Refund.
 Select Refund from the Quick Action menu of the charged payment.
 -
Review and confirm the refund The Refund dialog shows the charged amount available to return. Where an order contains custom or adjusted lines, the portal may add an adjustment line, so the refundable total is accurate. Review the amount and click Refund.
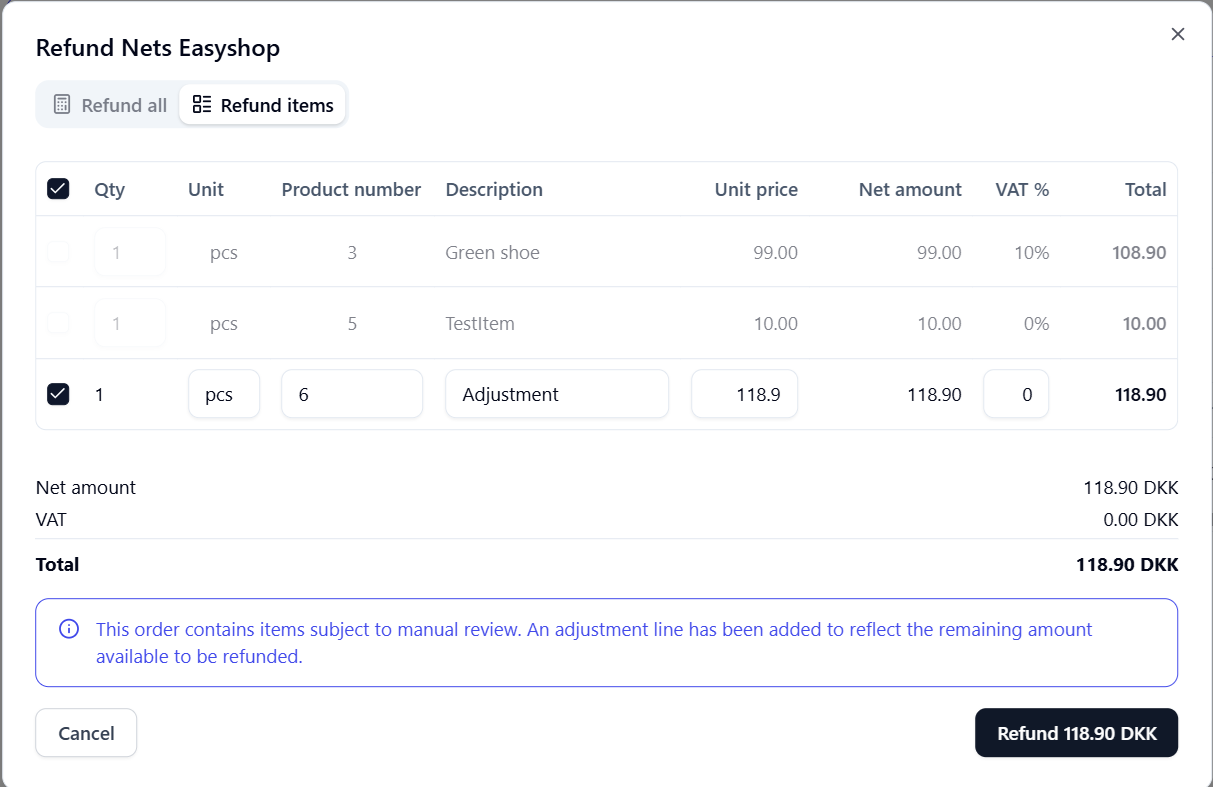 The Refund dialog — an adjustment line reflects the refundable amount.
 -
Confirm the refund is complete The payment status updates to Refunded in the Payments list.
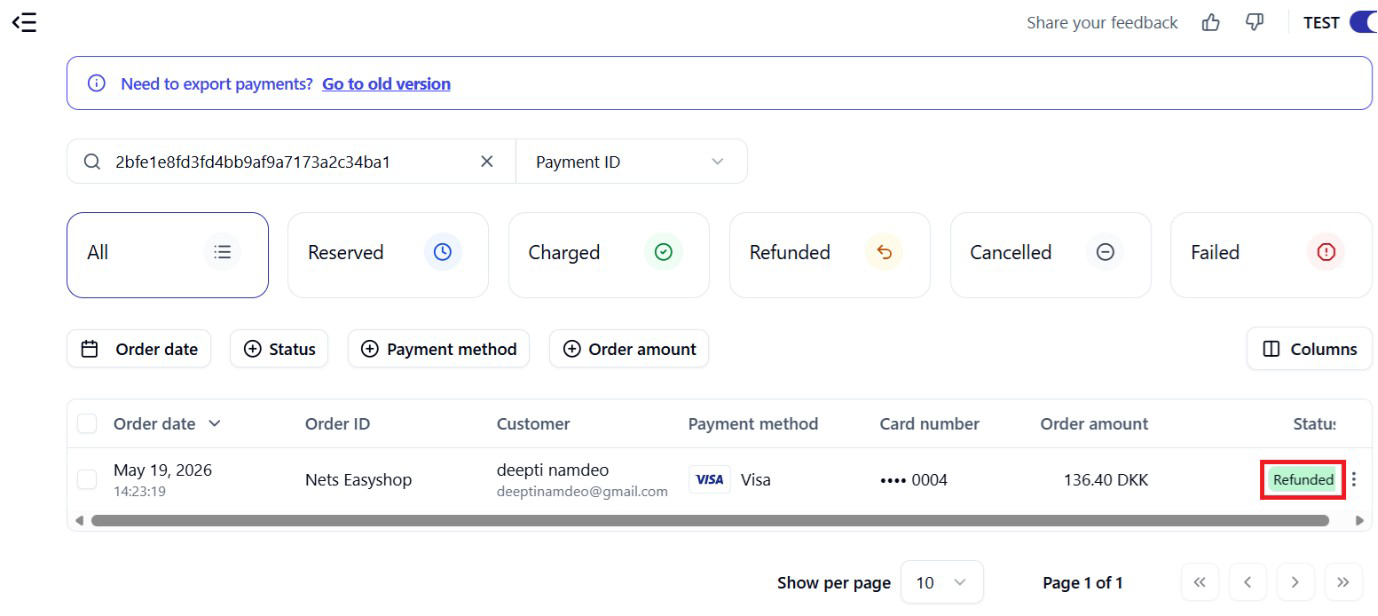 The payment shows the Refunded status.
 Select Refund from the Quick Action menu of the charged payment.
 The Refund dialog — an adjustment line reflects the refundable amount.
 The payment shows the Refunded status.
TIP Why an adjustment line appears When an order includes custom items added later, the portal adds an adjustment line in the Refund dialog. This ensures the amount you may refund matches what was charged from the customer.
TIP - Check the payment status
TIP Need more help? If a payment is not behaving as expected — for example, an action is greyed out or a status looks wrong — check the payment status first.
Cancel payments
Release reserved amounts on card payments
If a customer cancels an order before the goods are shipped, you can cancel the payment. By canceling a payment, the reserved money will be released to the customer's payment card and Nets will not charge a fee for the payment.
To cancel one payment, simply select the payment in the payment overview and choose Cancel from the QUICK ACTIONS drop-down menu. To cancel several payments at once, select the ones you want and choose Cancel.
note Note that it is not possible to change the status of a payment once it has been canceled.
Refunds
Refund the total or parts of a payment.
Full refund
To refund the total amount, you simply choose Refund from the QUICK ACTIONS drop-down menu.
Important!
If the payment has been partially charged and you want to refund the full payment, you need to make one refund per charge. The complete list of all charges related to the same original payment can be found by viewing the payment details. To find all charges that are related to the same original payment you choose View details on any line related to the order in the payments lists.
Edit and refund
All charged payments, including single or multiple order lines, may be partially refunded. To partially refund a payment, choose Edit and refund from the QUICK ACTIONS drop-down menu, select the desired order lines and/or edit the fields before choosing REFUND. You can use several actions depending on your needs. We have listed three examples below.
Not enough money to make a refund?
If there are not enough funds in your account when you have initiated a refund, the transaction will appear as “refunding” until the balance equals or exceeds the amount you want to refund plus the transaction fee. A refund can be completed in two ways:
- Charge new payments
- Make a deposit
If you don’t have any payments to charge, you can make a deposit to your account through a regular bank transfer.
The deposit does not need to match the exact amount of the refund and transaction fee. The excess amount will be booked as a deposit and included in your next payout.
The deposited funds will be visible on the payout page of your Easy account a couple of days after the bank transfer.
You can find more information on how to make a deposit, including account details and reference number, in the account section and on the payout page in case the balance is negative.
Note
- It normally takes a few days before the funds are transferred to your customer's account depending on the card issuer's (normally your customer's bank) routines.
- Your balance needs to be larger than the amount you want to refund including transaction fees. Make a deposit or charge new payments if your balance is too low.