Apple Pay
This guide outlines the basics of using Apple Pay via Checkout and gives you instructions needed for a fluent implementation.
Overview
Apple Pay is a mobile payment and digital wallet service provided by Apple Inc.
- It allows users to make payments using their compatible Apple devices (such as iPhone, iPad, or Apple Watch) in physical stores, within apps, and on the web.
- It provides a convenient and secure way for users to store their credit and debit card information and make payments with a single touch or glance.
Apple Pay uses a secure element within the device and Touch ID or Face ID to confirm payments, making it more secure than traditional card payments.
Functionality table
| Name | Description |
|---|---|
| Payment type | Wallet |
| Subscriptions | ❌ |
| Bin filter | ✅ |
| Refunds | ✅ |
| Partial refund | ✅ |
| Update order | ❌ |
| Cancel payment | ✅ |
| Reservation & charge | ✅ |
| CPSP | ✅ |
| IPSP | direct contract, non-collecting (cards are not supported like Amex and Girocard) |
| Supported card schemes | Visa, Mastercard and Dankort |
| Currencies | All currencies for Visa and Mastercard. Only DKK for Dankort. |
| Countries | All |
- Apple Pay is only supported on iOS (16 or later) operating systems.
- Supported browsers are: Safari, Firefox, Chrome, and Edge.
Apple Pay will not be shown in checkout if the above requirements are not met.
Apple Pay cannot be activated without Visa/Mastercard/Dankort being present on your account.
Activation
To activate Apple Pay as a payment method and to add it to your Checkout portal, you need to complete the onboarding journey.
You can activate Apple Pay as:
- Hosted Payment Page
- Embedded Payment Page
Hosted payment page
To activate the hosted checkout for Apple Pay, do the following:
- Login to the Checkout portal.
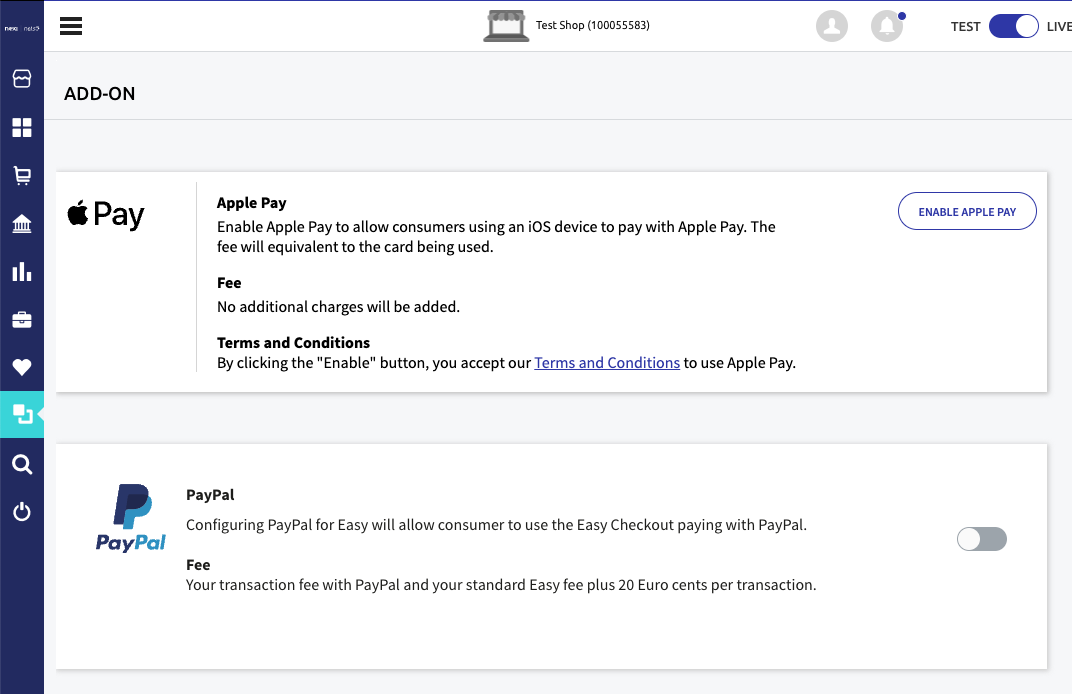
- Navigate to ADD-ON on left-hand side menu and ensure the your account is set to LIVE (top-right on screen).
- Click on ENABLE APPLE PAY to activate the the Apple Pay option.
You have now successfully enabled Apple Pay as Hosted Payment Page in your checkout.

Embedded payment page
To activate the embedded checkout for Apple Pay, do the following:
- Login to the Checkout portal.
- Navigate to ADD-ON on left-hand side menu and ensure the your account is set to LIVE (top-right on screen).
- Click on ENABLE APPLE PAY to activate the the Apple Pay option.
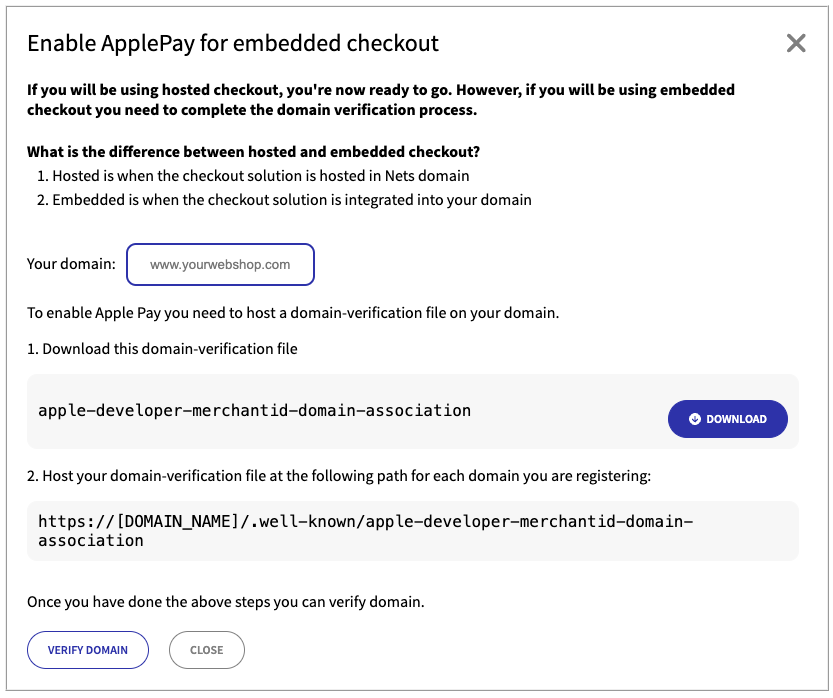
- Write your domain name into the domain name box. Ensure that you write the correct domain name.
- Click on DOWNLOAD to get your domain-verification file.
- Upload the domain-verification file to your website at the URL at step 2 in the screenshot below.
- Click on VERIFY DOMAIN.
You have now successfully enabled Apple Pay as Embedded Payment Page in your checkout.

Error codes
The following error codes with description can help you to understand if you have not successfully enabled the Apple Pay for embedded checkout.
| Error Code | Description | Explanation |
|---|---|---|
| NotFound | Your store URL was not found. Please check the domain URL was entered correctly, and check the path https://{domain}/.well-kown/apple-developer-merchantid-domain-association is responding. | Request to https://{domain}/.well-known/apple-developer-merchantid-domain-association returned NotFound response. |
| FileContentIsEmpty | File content is empty. Please check that you’ve uploaded the verification file. | We're able to reach https://{domain}/.well-known/apple-developer-merchantid-domain-association but response is null, empty or white space. |
| FileContentShouldNotContainHtml | File content is not correct. Please check that your verification file does not contain any HTML code. | We're able to reach https://{domain}/.well-known/apple-developer-merchantid-domain-association, response content is not empty but response content contains html code. |
| FileContentIsNotCorrect | File content is not correct. Please check that you’ve uploaded the correct verification file. | We're able to reach https://{domain}/.well-known/apple-developer-merchantid-domain-association, Content-Type is correct and able to get response content but file content is not correct. Possibly they uploaded wrong verification file. |
| FileContentTypeIsNotCorrect | File content is not correct. Please check that your verification file Content-Type is “text/plain.” | We're able to reach https://{domain}/.well-known/apple-developer-merchantid-domain-association but response Content-Type is not text/plain. |
| ResponseTypeIsNotOk | We can’t read the verification file. Please check that the path https://{domain}/.well-kown/apple-developer-merchantid-domain-association is responding. | Request to https://{domain}/.well-known/apple-developer-merchantid-domain-association returned a response but not Ok nor NotFound nor BadRequest. We're not able to read domain verification file content. |
| BadRequest | We can’t find the verification file. Please check if the domain URL was entered correctly and make sure that your system is responding. | Request to https://{domain}/.well-known/apple-developer-merchantid-domain-association returned BadRequest response. Since we're doing get request this is a really rare case. Possible cause might be while we're making request we got an exception. In this case we should check logs. Possibly domain is available but it's not able to process any request. |
| NoSuchHostIsKnown | We can’t find your site. Please check if the domain URL was entered correctly and make sure that your system is responding. | We're not able to do any request to domain verification file. Possible merchant entered wrong url and entered domain is not available. |
Plugins configuration overview
To enable embedded checkout for Apple Pay, you need to prepare your plugin environment and a place for the domain-verification file for the transaction.
In general, the apple-developer-merchantid-domain-association file should be in the ".well-known" folder and the public root path, so that it is accessible via the link: https://[DOMAIN_NAME]/.well-known/apple-developer-merchantid-domain-association.
Usually, there are public folders that contain the root path.
Nginx and Apache should be structured to read this file without the extension from the ".well-known" folder.
Depending on the server and platform, the configuration may differ.
Here are some example configurations for Nginx and Apache servers that we may need to add to the configuration files:
Nginx
Usually in /etc/nginx/{shop}.conf
Nginx code example
# .htaccess, .DS_Store, .htpasswd, etc., but keep .well-known available
location ~* /\.(?!well-known\/) {
deny all;
}
To find out more, please follow this reference link.
Apache
.htaccess in public folder
Apache code example
RewriteCond %{REQUEST_FILENAME} -f
RewriteRule
It is important to remember that these are generic examples, and everyone can have their configuration so the best way is to customize the solution on the above requirements.
Below are examples of the given platforms and explanations on how to modify the basic configuration.
WooCommerce
Read more about our WooCommerce plugin here.
Step 1:
Download your domain-verification file from the Checkout portal.
Step 2:
Upload the domain-verification file to your website using an FTP or SFTP client:
- Navigate to the WordPress root directory.
- In this folder, you should find directories “wp-admin”, “wp-content” and “wp-includes” et al.
- Create a new directory with the following name: “.well-known”.
- Paste the domain-verification file inside the “.well-known” directory.
Step 3:
Make sure your server is configured properly so the file is hosted and available at the following path: https://[YOUR_DOMAIN]/.well-known/apple-developer-merchantid-domain-association.
See the example configuration documented by Nexi.
Shopware 6.5
Read more about our Shopware 6.5 plugin here.
Step 1:
Download your domain-verification file from the Checkout portal.
Step 2:
Upload the domain-verification file to your website using an FTP or SFTP client:
- Navigate to the Shopware root directory.
- Go to the “/public” folder.
- Create a new directory with the following name: “.well-known”.
- Paste the domain-verification file inside the “.well-known” directory.
Step 3:
Make sure your server is configured properly so the file is hosted and available at the following path: https://[YOUR_DOMAIN]/.well-known/apple-developer-merchantid-domain-association.
See the example configuration documented by Nexi.
Magento 2
Read more about our Magento 2 plugin here.
Step 1:
Download your domain-verification file from the Checkout portal.
Step 2:
Upload the domain-verification file to your website using an FTP or SFTP client:
- Navigate to the Magento 2 root directory.
- Go to the “/pub” folder.
- Create a new directory with the following name: “.well-known”.
- Paste the domain-verification file inside the “.well-known” directory.
Step 3:
Make sure your server is configured properly so the file is hosted and available at the following path: https://[YOUR_DOMAIN]/.well-known/apple-developer-merchantid-domain-association.
See the example configuration documented by Nexi.
PrestaShop 1.7
Read more about our PrestaShop 1.7 plugin here.
Step 1:
Download your domain-verification file from the Checkout portal.
Step 2:
Upload the domain-verification file to your website using an FTP or SFTP client:
- Navigate to the PrestaShop root directory.
- Create a new directory with the following name: “.well-known”.
- Paste the domain-verification file inside the “.well-known” directory.
Step 3:
Make sure your server is configured properly so the file is hosted and available at the following path (see PrestaShop documentation here): https://[YOUR_DOMAIN]/.well-known/apple-developer-merchantid-domain-association.
Opencart 3.0
Upload the domain-verification file to your website using an FTP or SFTP client:
- Navigate to upload directory
- Create a new directory with the following name: ".well-known"
- Paste the domain-verification file inside the ".well-known" directory
Additional steps if you are running Nginx:
- To make access for that directory, make sure that your nginx config approves the directories with a dot. There might be a case where you need to approve that in your nginx config file.
Read more about our OpenCart 3.0 plugin here.
Oxid 6.5
Step 1:
Download your domain-verification file from the Checkout portal.
Step 2:
Upload the domain-verification file to your website using an FTP or SFTP client:
- Navigate to the Oxid root directory.
- Go to the “/source” folder.
- Create a new directory with the following name: “.well-known”.
- Paste the domain-verification file inside the “.well-known” directory.
Step 3:
Make sure your server is configured properly so the file is hosted and available at the following path: https://[YOUR_DOMAIN]/.well-known/apple-developer-merchantid-domain-association.
Plentymarkets 7
Read more about our Plentymarkets 7 plugin here.
Step 1:
Download your domain-verification file from the Checkout portal.
Step 2:
- Open the domain-verification file using a text editor and copy the contained content.
- Navigate to the plugin assistant in your plentymarkets backend.
"Setup > Assistants > Plugins > Plugin-Set"
- Go to the assistant section "Apple Pay".
- Activate the corresponding toggle "Provide information for domain verification".
- Insert the content of the domain-verification file into the text area.
- Complete the assistant.
Step 3:
Make sure the configuration was carried out properly by checking if the content of the domain-verification file is available at the following path: https://[YOUR_DOMAIN]/.well-known/apple-developer-merchantid-domain-association.
User journey
This following section will describe the user journey and payment flow for your customer:
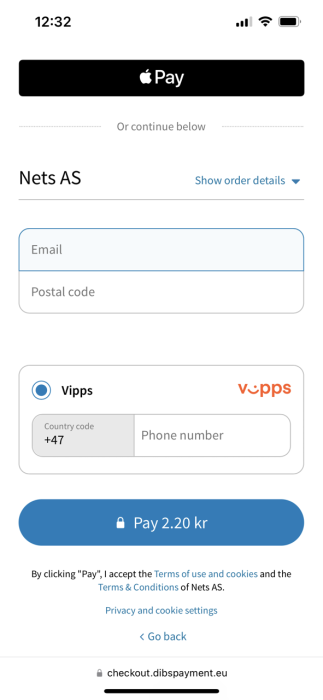
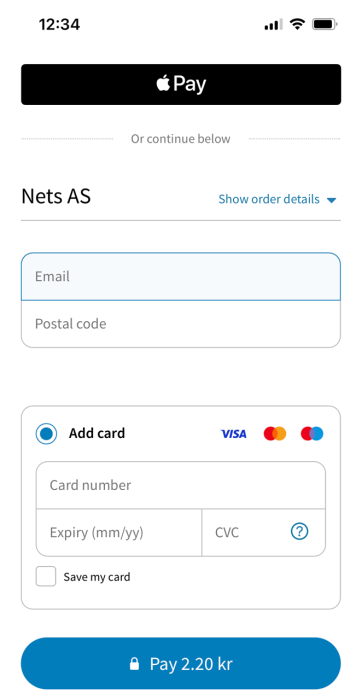
- When your consumer chooses Apple Pay as a payment method in the checkout, they will prompted to Apple Pay window.
- Customer can pay with
- "Pay with Touch ID" or
- "Double click to pay" depending on what system they are using.
Payment flow
If you use paymentMethodsConfiguration parameter to only show the payment method(s) that are preferred for the specific payment, Apple Pay can also be selected.
Apple Pay is available only on Apple devices.
Apple Pay is defined as a Wallet and can be displayed alone and together with other payment methods. It is not recommended to show Apple Pay alone if you do not detect the device used in the webshop before you are going to show the payment options.
If Apple Pay is used alone on devices other than iOS/iPadOS/MacOS, there will be no visible payment methods and it is naturally a poor user experience. Apple Pay can be combined with other Wallet payment methods or together with cards.
Recommended usage of the paymentMethodsConfiguration parameter for Apple Pay.
If you have more than one wallet configured, you can use:
code
paymentMethodsConfiguration:[{"name":"Wallet"}]

If Apple Pay is used as the only wallet, you should include card as well:
code
paymentMethodsConfiguration:[{"name":"Card"},{"name":"ApplePay"}]
