Manage subscriptions
This guide is for developers who want to charge, verify, and update subscription payments programmatically using the Payment API.
Before you start
This guide assumes that you have followed and implemented the guides:
- Integrate Checkout on your website
- Support subscriptions (on the checkout page)
Overview
Once you have a checkout page that can handle subscriptions, it is time to implement functionality on your backend to manage the subscriptions:
-
Charge subscriptions: You can charge one or multiple subscriptions at once. Charging a subscription is an asynchronous operation. You create a new bulk charge operation and then retrieve the status of the operation at a later stage.
-
Verify subscriptions: Subscriptions become invalid over time. For example, payment cards expire or could be reported stolen. You can verify your subscriptions before charging so that your customers have time to update their subscriptions.
-
Update invalid subscriptions: Reach out to the customers who have invalid subscriptions so that they can update the subscription with new payment details.
Important
It is not permitted to create subscriptions with low amount (like 1.00 EUR) just to register a card with Checkout. Instead, create a payment with unscheduled subscription object amount=0 to verify the card.
If the card is valid, you will be able to query for the token (unscheduled subscription ID) and use it for future charges.
This is the compliant way to register a card without charging the customer and get a token back. Low-value amount transactions (1.00 EUR / SEK / DKK /etc.) that are not captured or cancelled may be declined or generate fines from Visa or MasterCard.
| Name | Type | Supported |
|---|---|---|
| SEPA Direct Debit | A2A | ❌ |
| Swish | A2A | ❌ |
| Trustly | A2A | ❌ |
| American Express | Cards | ✅ |
| VISA & MasterCard | Cards | ✅ |
| Maestro | Cards | ❌ |
Dankort | Cards | ✅ |
AfterPay-Riverty | Invoice/Installments/campaigns | ❌ |
| Ratepay | Invoice/Installments | ❌ |
| MobilePay | Wallet | ❌ |
| PayPal | Wallet | ❌ |
| Wallet | ❌ |
You can find more in-depth information, including countries, currencies, testing, functionality of payment operations, etc. in the relevant linked sections.
Step 1: Retrieve subscriptions details
Before you can charge or verify a subscription, you first need to obtain the identifier of the subscription. You can get the subscription identifier from Checkout Portal or the Payment API. The guide Support subscriptions describes how to retrieve subscription details, including the subscriptionId, so it will not be repeated here. Please see Step 5: Retrieve subscription using the Payment API for more details.
Step 2: Charge a subscription
When a new subscription payment has been created and you have retrieved the subscriptionId, you can initiate new payments associated with the subscription. The only limiting factors are the time and interval constraints that were specified when creating the subscription. Apart from that, you are free to create arbitrary payments with completely different order items and amounts.
When charging a subscription, you need to provide a full order that specifies what you are charging your customer for. Use the Bulk charge subscriptions method to charge a subscription.
If you want to get notified for successful subscription charges, you should listen to payment.charge.created.v2. If you want to get informed about failed subscription charge attempts, you should listen to payment.reservation.failed.
Here is an example:
Charge subscription
- PHP
- Node
<?php

$secretKey = "<YOUR_SECRET_API_KEY>";
Remember to replace <YOUR_SECRET_API_KEY> with your secret key.
The payload is typically created dynamically by your backend. But if you just want to try it out, you can use the following hard-coded request body that charges for a single item. Remember to replace <SUBSCRIPTION_ID> with a valid subscription identifier.
Charge a subscription (request)
{
    "externalBulkChargeId": "1001",
    "subscriptions": [
        {
At the very top of the request body, a property called externalBulkChargeId is specified. This identifier should be specified by you and should be a unique string per bulk charge operation you create. If you for some reason need to send the same bulk charge request again, because of a failing network or other reason, you should provide the same externalBulkChargeId so that your customers are not being charged multiple times. See also the the section Using external identifiers to enable retries in the API reference.
It's common to charge all active subscriptions regularly on specific dates, for example the last day in the month. In those cases, it is convenient to be able to charge multiple subscriptions at once.
If you want to get notified for successful subscription charges you should listen to <payment.charge.created>. If you want to get informed about failed subscription charge attempts, you should listen to <payment.reservation.failed>
Remember to replace <YOUR_SECRET_API_KEY> with your secret key.
Step 3: Charge multiple subscriptions
It is possible to charge multiple subscriptions in bulk. This is useful if you offer your customer a subscription service where all customers are charged at the same time, for example the first day of the month.
In a single API call, you can charge an arbitrary amount of subscriptions. The subscription identifiers are typically saved on your side so that you can compose charge requests of all your subscriptions.
Important: Please note that for bulk charges on subscriptions, a request can run a maximum limit of 20.000 without webhooks.
Recommendation: In case a bulk charge has more than 20.000, it is recommended to divide it up and to run the calls with more time in-between such as 5 minutes per call.
Here is an example of a payload which charges two active subscriptions. Remember to replace <SUBSCRIPTION_ID_1> and <SUBSCIRIPTION_ID_2> with actual subscription identifiers before posting the request.
Bulk charge subscriptions (request)
{
    "externalBulkChargeId": "1002",
     "notifications": {
        "webhooks": [ ]
The example also demonstrates that it is possible to add an array of webhooks to the request so that you can track the events triggered by the bulk charge operation. You can find more information about the notifications property in the API reference.
Each subscription you try to charge will generate a new payment object and therefore also trigger a new sequence of webhook events. For example, if you charge 10 subscriptions in a bulk request, there will also be 10 payment.charge.created.v2 events triggered.
If the charge request was sucessful, a 202 HTTP status code is returned with a new bulk identifier:
Bulk charge subscriptions (response)
{
    "bulkId": "d6c11ab596184414bef9adf20936e583"
}
A successful response does not imply that all of the subscriptions have been charged successfully. However, you can use the bulkId, returned in the response body, to retrieve details about a bulk charge operation, as shown in the following step.
Step 4: Retrieve bulk charge details
When you perform a bulk charge operation, subscriptions might fail for various reasons, for example:
-
Not enough funds on the card, which makes the bank reject the reservation. In this case you can inform your customer about the situation and try to do a new charge.
-
The card has become invalid because it has expired, has been reported stolen, etc. In this case you need to update the subscription.
To retrieve the status of a bulk charge operation, you can use the method Retrieve bulk charges.
The response is paginated since a lot of subscriptions are potentially being processed. You have two options when specifying the range of charges you want to retrieve:
- Use
skipandtake. - Use
pageNumberandpageSize.
In the sample code below, skip and take is used to specify that the first 10 subscriptions should be retrieved:
Retrieve bulk charges
- PHP
- Node
<?php

$secretKey = "<YOUR_SECRET_API_KEY>";
$bulkId = "<BULK_ID>";
The response from the server indicates that all subscriptions were returned ("more": false) and that all charges have completed successfully:
Retrieve bulk charges (response)
{
    "page": [
        {
            "subscriptionId": "6946cde8d7a049dc89145224088b0df9",
Step 5: Verify subscriptions (optional)
Failed charges are common when managing subscriptions. Instead of catching invalid subscriptions after a bulk charge operation, you can instead verify subscriptions one or a few days before you plan to do the charge. If you find any invalid subscriptions, you then have the chance to contact your customer in advance.
The process of verifying subscriptions is similar to charging subscriptions:
- Create a bulk verification using the Verify subscriptions method (HTTP POST).
- Retrieve the verification details using the Retrieve verifications method (HTTP GET). This method also supports pagination as demonstrated in Step 4: Retrieve bulk charge details.
- Please note for this step that it involves the account verification with either the soft or hard declines. You can read more about it from here.
Step 6: Update invalid subscription
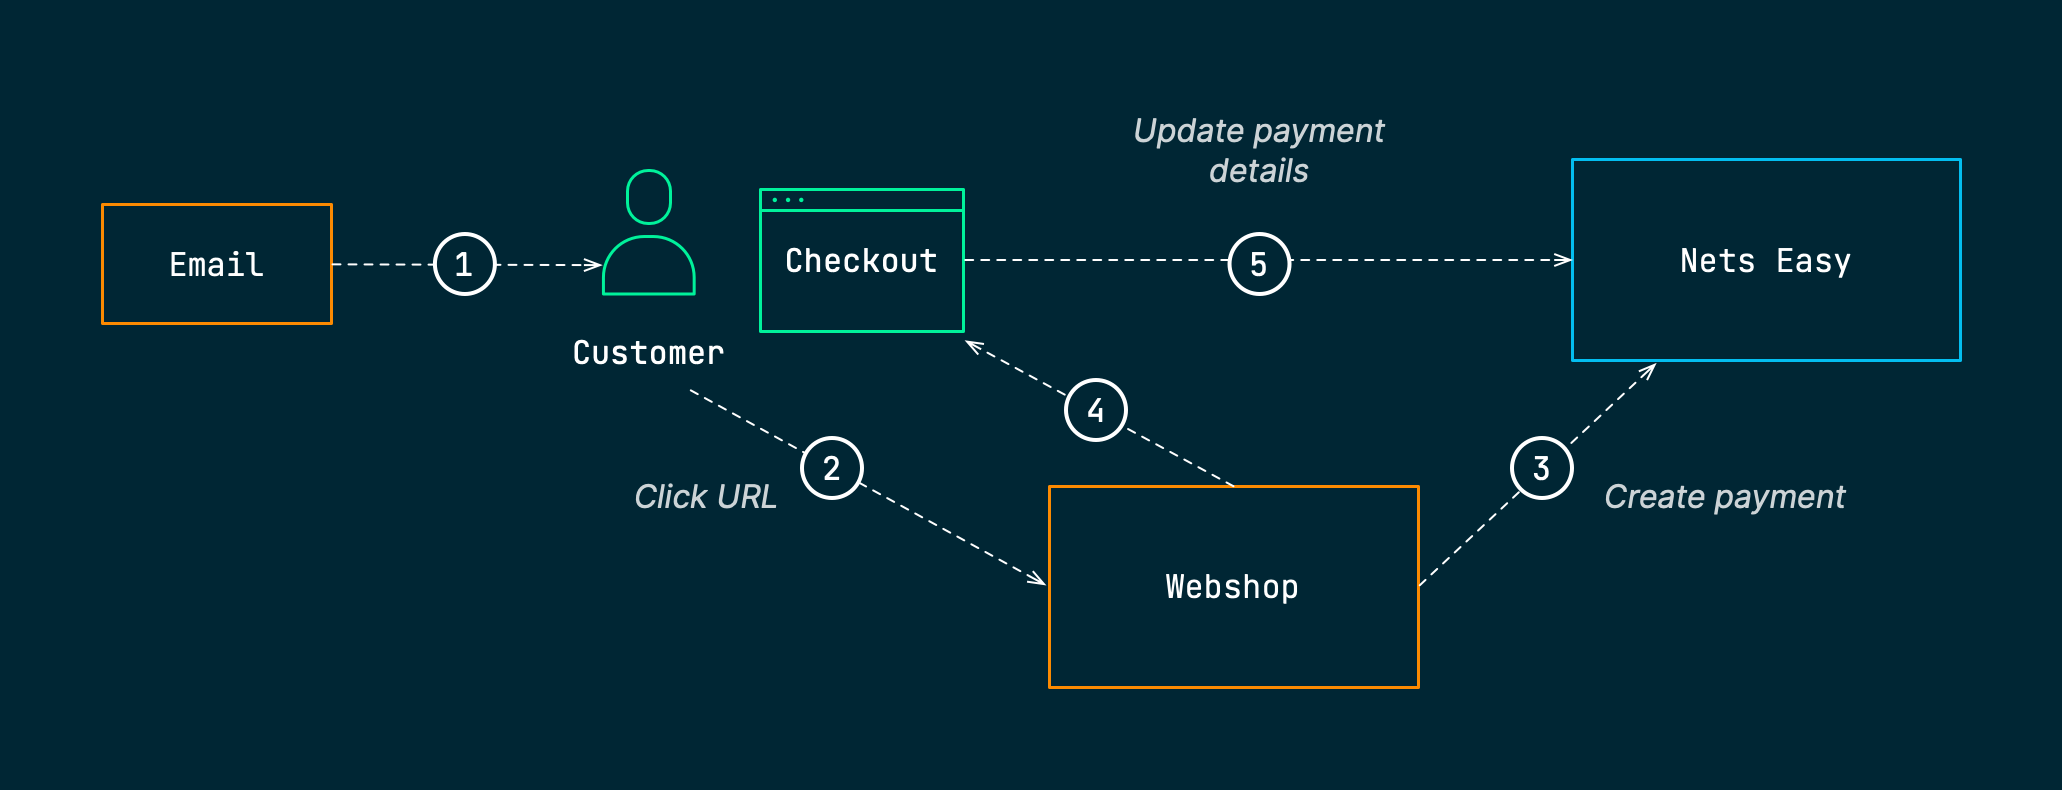
If you are no longer able to charge a subscription because the payment card has become invalid, you need to update the subscription. This requires that your customer supplies new payment details to Nexi Group using your checkout page. Here are the steps required for updating a subscription:
- Inform your customer that the subscription needs to be renewed (using email, mobile notification or similar). Provide a link to your site with the subscription identifier appended to the URL. For example,
https://<YOUR_WEBSITE>/update?subscriptionId=62a30d49…. - Your customer clicks on the URL that points to your website.
- The backend of your website uses the Create payment method and attaches the
subscriptionIdto thesubscriptionobject of the request body. This request tells Checkout that you want to update a subscription instead of creating a new one. - Direct your customer to your checkout page (embedded or hosted) in the same way you do when creating a new subscription. Since you are updating a subscription, Checkout will present a form to update the payment details.
- Your customer provides new payment details to Checkout.
This entire flow is visualized in the image below:

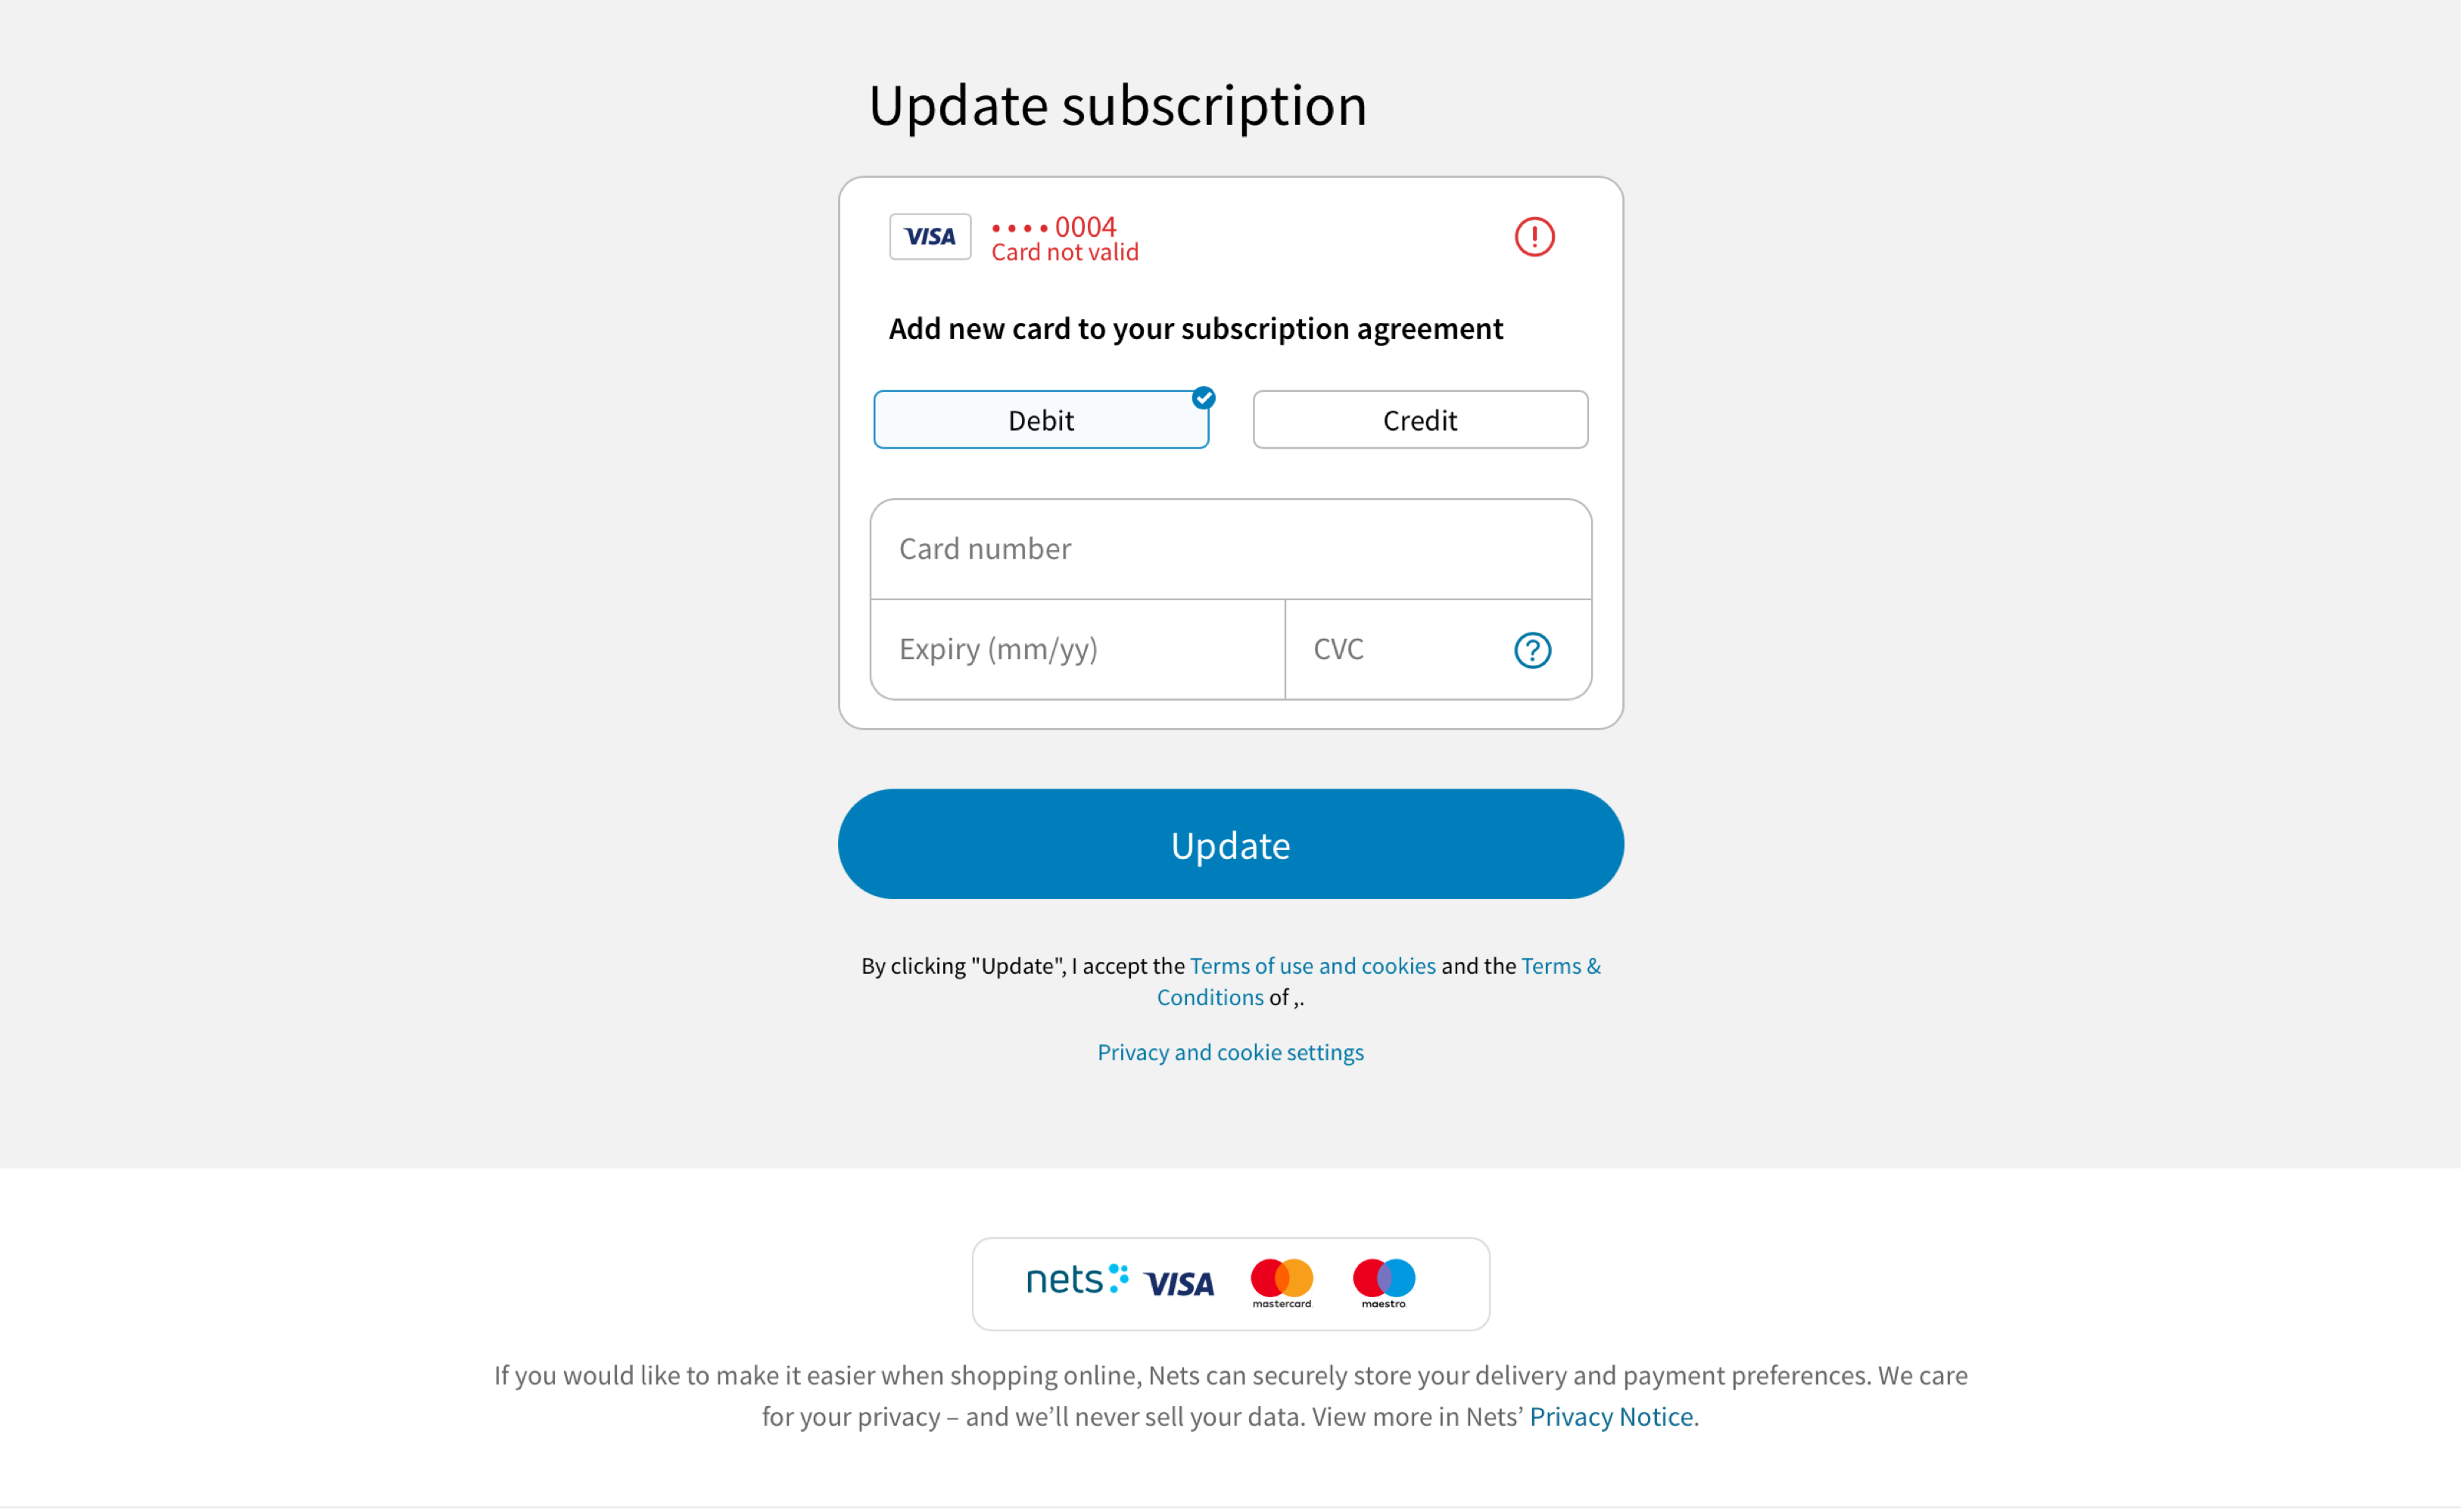
The following screen shot shows a checkout form when it is presented to the customer when updating a subscription.

Congratulations!
You now know how to:
- Charge a single subscription or multiple subscriptions in bulk
- Verify subscriptions
- Update invalid subscriptions