Integrate Checkout on your website
This guide is for developers who want to add online payments to their website using Checkout.
Before you start
Before you start, you need:
- An Checkout Portal account. See create account for more information.
- Your integration keys for the website you are developing. Need help?
- A running web server which can host HTML pages and execute server side scripts.
What you are building
This guide shows you how to integrate a hosted checkout on your website.
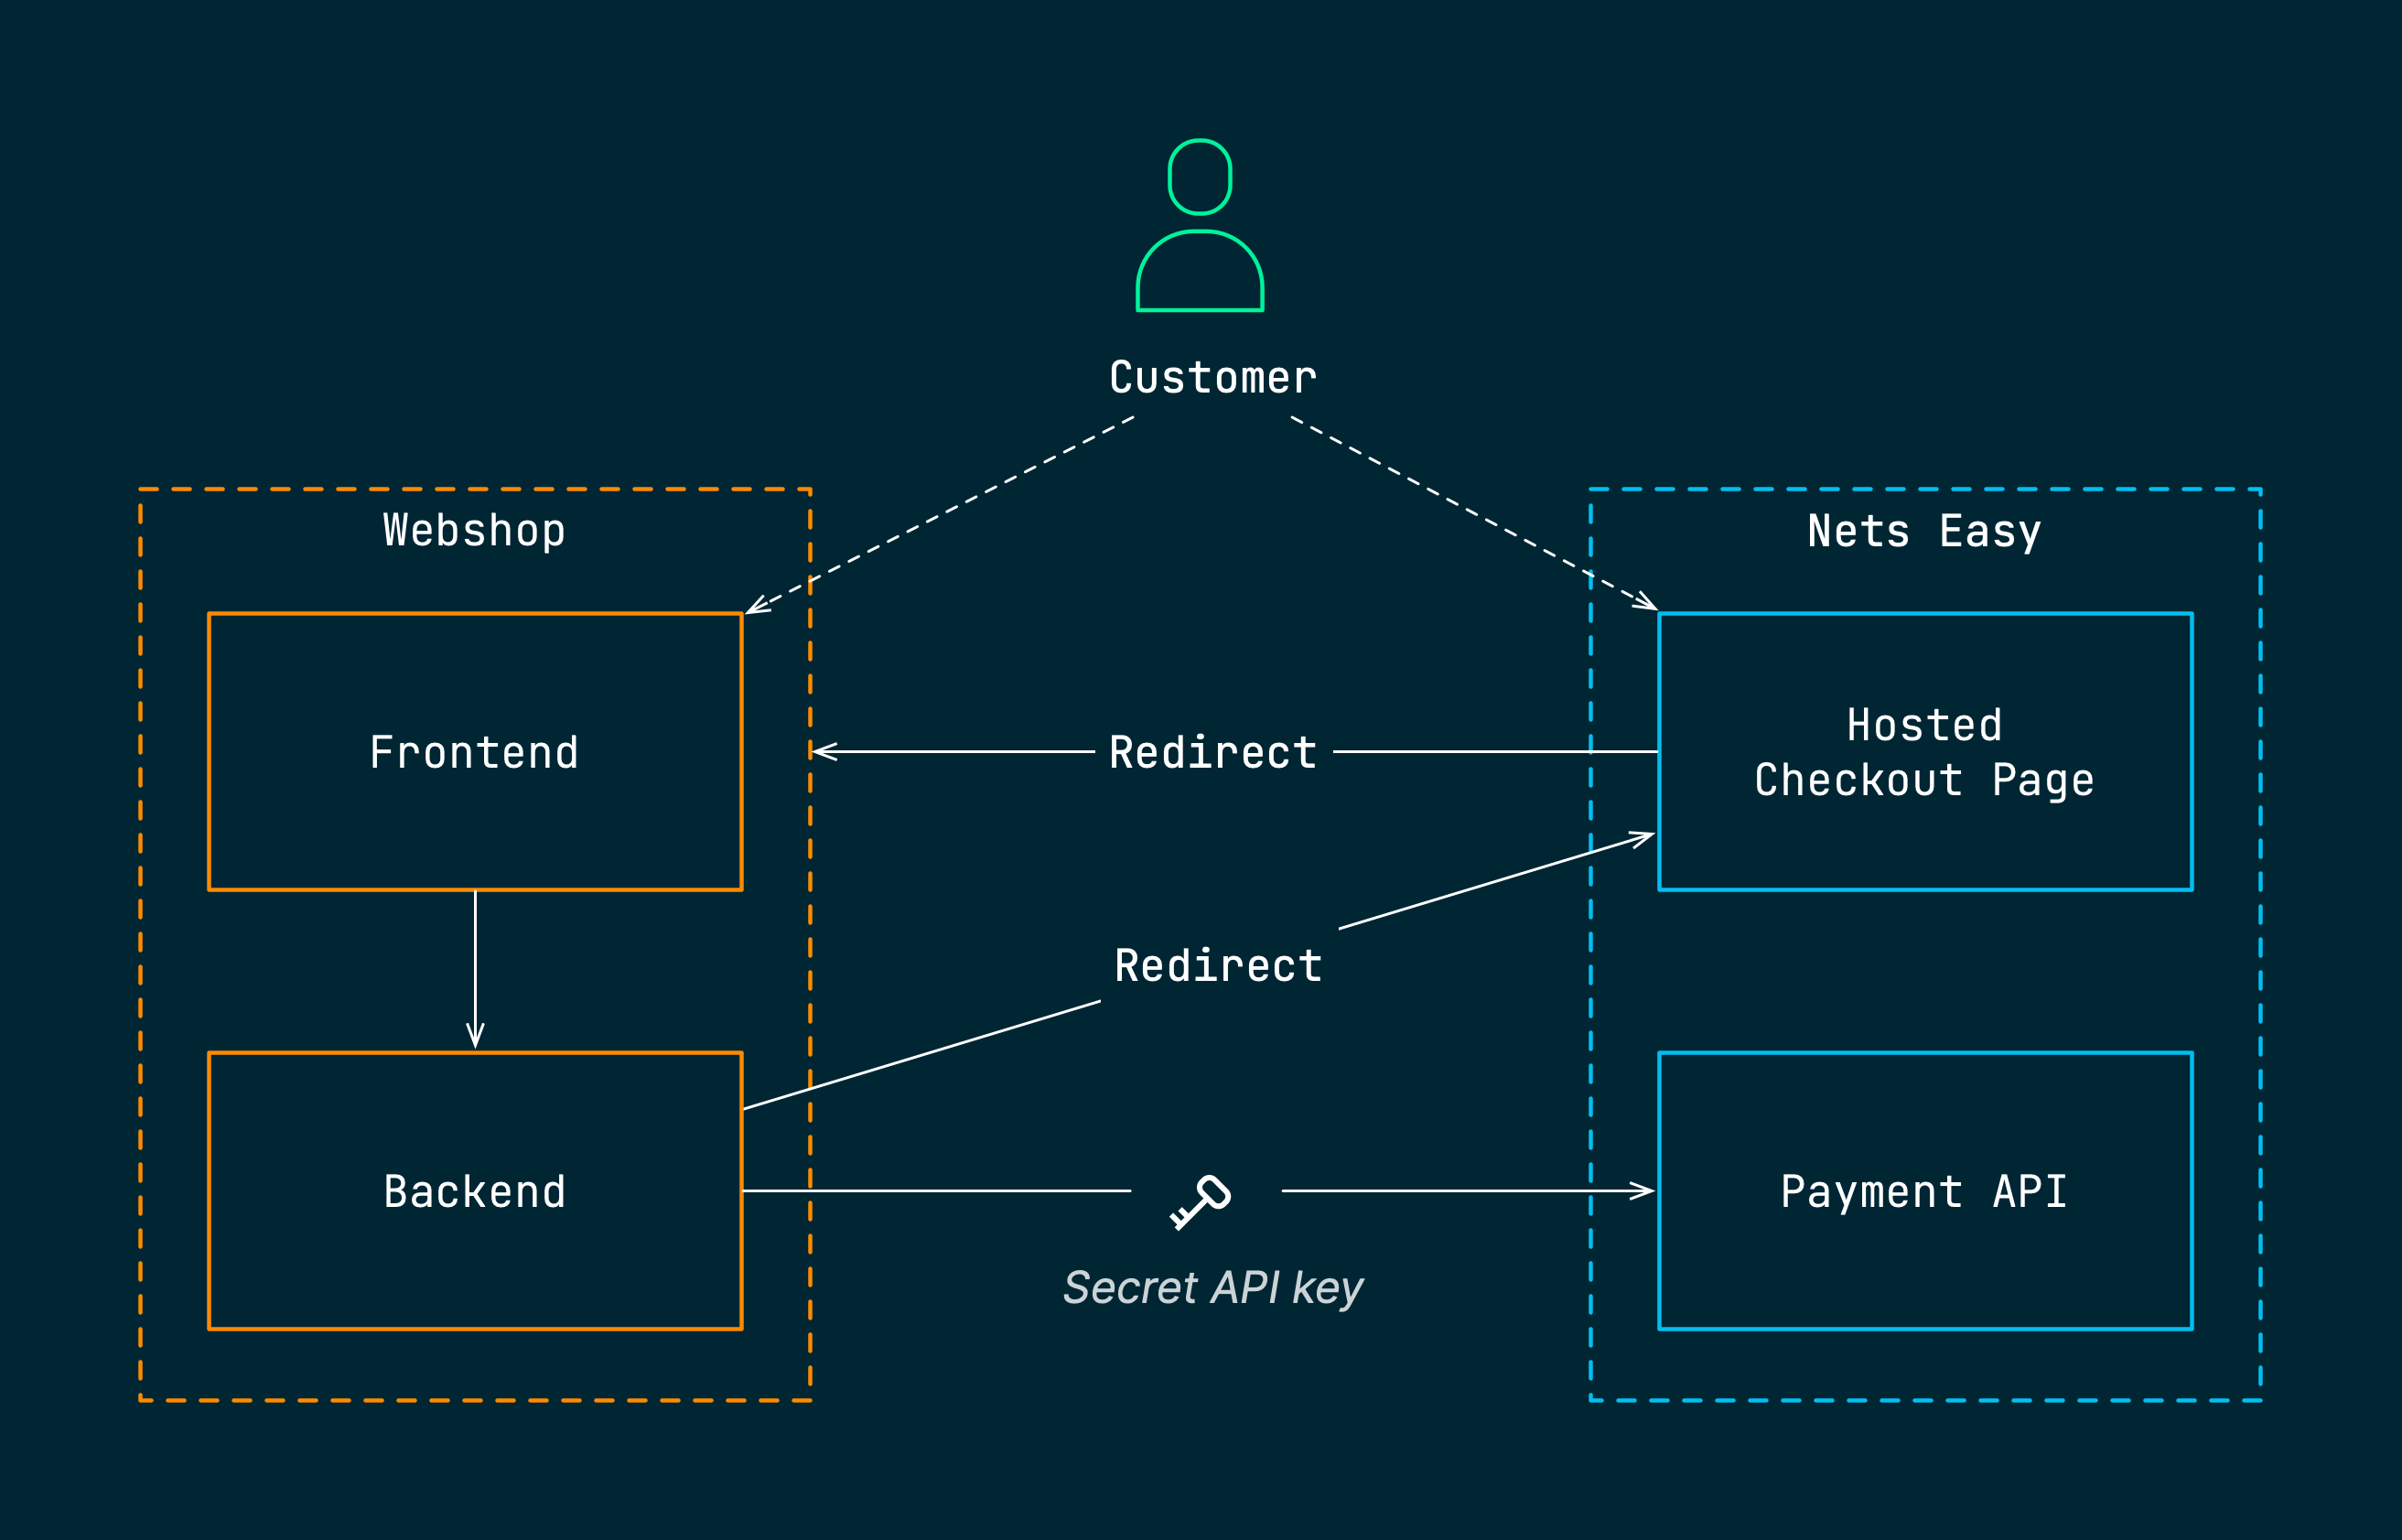
The backend of your website communicates with the Payment API using your secret API key to initiate a new payment. Your customer is then redirected to a checkout page, hosted by Nets, which manage the complete checkout flow. Once the purchase has been completed, the control is handed back to your webshop through a second redirect.

Important
The secret API key must never be exposed to the public and should only be passed over encrypted server-to-server communication (HTTPS). In contrast, the checkout key is only an identifer and can be exposed to the frontend of your site.
Step 1: Initiate the checkout from your site (frontend)
The checkout is initiated from the client. The minimal shopping cart listed below will serve as a starting point for the payment flow:
Shopping cart
- PHP
- Node
<!DOCTYPE html>
<html>
  <head>
    <title>Shopping Cart</title>
If you try clicking the checkout link now, you will receive an error since you haven't implemented the backend yet. Let's move on to the next step and fix this error.
Step 2: Create a payment object (backend)
Each payment session is represented by a payment object. In order to start a checkout flow for your customer, you first need to create a payment object and retrieve the paymentId referencing that object. Creating a payment object requires your secret API key. Therefore, this request has to be initiated from the backend of your site.
The following backend script will create a new payment object and return the paymentId to the frontend:
Create payment
- PHP
- Node
<?php

function redirect_to_checkout($json) {
        // Will be implemented in the next step
Replace the text <YOUR_SECRET_API_KEY> with your secret API key.
In this example we simply read a hardcoded JSON object from the file payload.json shown below.
Normally, this would be the place where you dynamically create a JSON object based on your customer's order items.
For now, you can just add the static JSON file payload.json that can be used for testing:
Request body
{
  "checkout": {
    "integrationType": "HostedPaymentPage",
    "returnUrl": "https://<YOUR_SERVER>/cart.html",
Replace the text <YOUR_SERVER> with the server address to your site.
The request body includes:
- Integration type (
checkout.integrationType): This setting determines whether to use an embedded checkout or a hosted checkout. The valueHostedPaymentPagetells Nexi Checkout that you want to redirect to a hosted checkout page. - Return URL (
checkout.returnUrl): The URL on your site which the customer will be to your checkout page. This URL must match the URL to your checkout page exactly, including protocol (http/https) and the fully qualified domain name (FQDN). - Terms URL (
checkout.terms.Url): A URL to a page on your site that describes the payment terms for your webshop. - Order details (
order): Includes order items, total amount, and currency. Here an example product is added to the order since at least one order item is required when creating a new payment object. Normally, you would add your actual products here instead.
You should now be able to click the checkout button and then see the JSON response in your web browser. Here is an example of a response:
Response body
{
  "paymentId": "0260000060003b7b47f0833...",
  "hostedPaymentPageUrl": "https://test.checkout.dibspayment.eu/hostedpaymentpage/?check..."
}
The response body includes:
- Payment identifier (
paymentId): The identifier of the newly created payment object. You can use this identifier whenever you need to refer to this payment (for example in Checkout Portal). - Redirect URL (
hostedPaymentPageUrl): The URL to the pre-built checkout page which you should redirect your customer to.
Let's implement the functionality for redirecting your customer to the checkout page.
Step 3: Redirect to the pre-built checkout page (backend)
Instead of printing the JSON response back to the web browser, you should now instead redirect the customer to the checkout page. Here is the new version of the redirect function:
Redirect to checkout
- PHP
- Node
// ...

// Replace redirect function
function redirect_to_checkout($json) {
This new version performs a HTTP redirect by returning a Location HTTP header back to the browser. The optional language parameter (language) appended to the URL specifies the language to be used on the checkout page.
Important
Make sure you don't output anything from the server side script before sending the HTTP header, or the web browser will fail to perform the redirect.
Step 4: Test your checkout page
You should now have a rudimentary checkout page that can be tested using the test cards available on the page Test card processing.
Here's how you test your new checkout page:
- Reload the shopping cart page and click the "Proceed to Checkout" button.
- Fill out the address form using your email, phone, and postal code.
- Insert any of the sample card numbers and click the "Pay" button.
- Play around!
The simulated payment processing should now start and eventually get you back to the "Payment completed" page you created in the previous step.
Troubleshooting
- Verify that you are using the correct integration keys for the test environment.
- When changing the checkout URL, make sure you reload the shopping cart page so that a new payment session is created (and a new
paymentId).
Congratulations!
You've now integrated a hosted checkout.